LiveShell 2

About live streaming delays

A delay from several seconds to a few minutes can occur between the LiveShell 2 video input and preview display Dashboard or live video stream.

This delay is caused by RTMP server processing, network routing between LiveShell 2 and the RTMP server and the physical location of each server in the route. The delay is unavoidable and cannot be made shorter by changing settings on LiveShell 2 or Dashboard.

Other broadcasting service setting

*Please have your RTMP server address (URL) and other RTMP server information at hand before proceeding with these steps.

1.Dashboard settings

1-1. Access Dashboard and login to your Dashboard account.

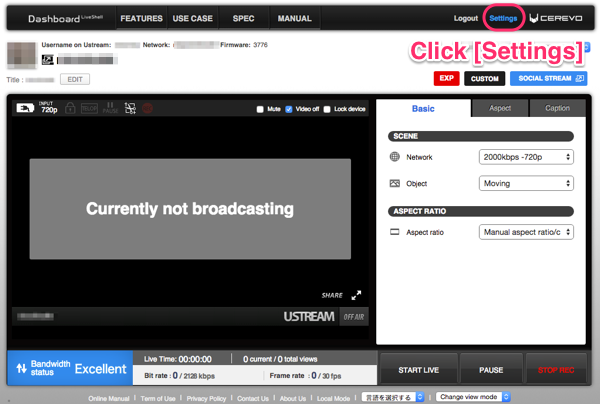
1-2. Click [Settings] on the top right of Dashboard.
ub202_en_cap_setting01

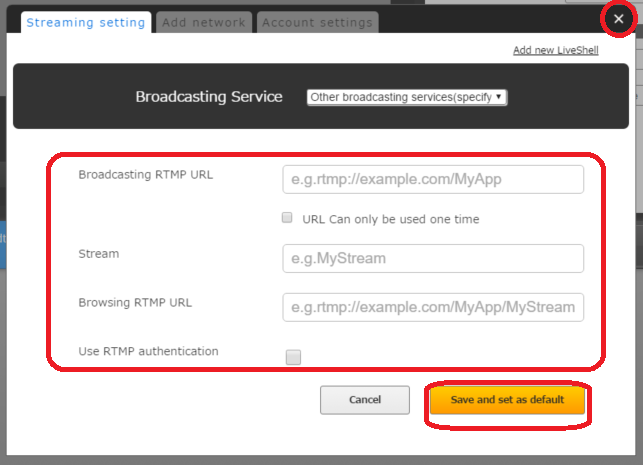
1-3. Select [Other broadcasting services (specify RTMP URL)] from the pulldown list of Broadcasting Services.
1

1-4. Enter your server’s broadcasting RTMP URL, other information then click the [Save and set as default] button.
1-5.Click [x] to close the set up window.
sample

2.Start broardcasting

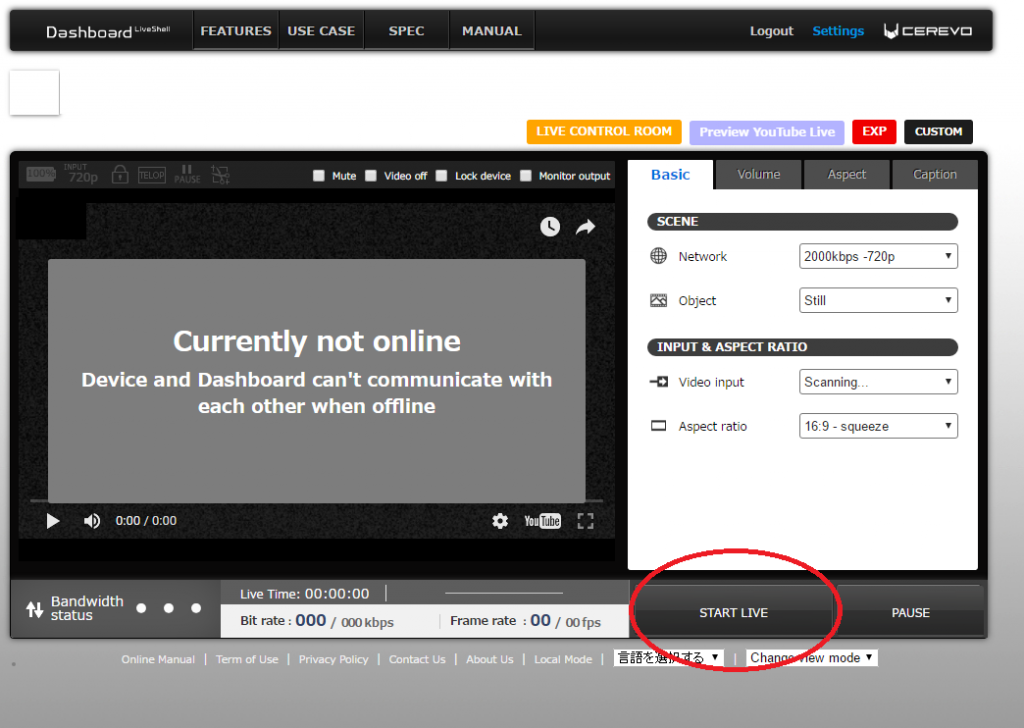
Click [START LIVE] on Dashboard.
2

Firmware Update

  1. How to update using device buttons
  2. How to update using Dashboard
  3. Release Notes
    1. Firmware Rev.3878 (2017.09.06)
    2. Firmware Rev.3846 (2016.12.02)
    3. Firmware Rev.3780(2016.5.10)
    4. Firmware Rev.3779(2016.04.16)
    5. Firmware Rev.3776(2016.02.25)
    6. Firmware Rev.3739(2015.12.03)

How to update using device buttons

  1. Make sure you are offline.
  2. Connect the AC adapter to the LiveShell 2
  3. Start live streaming so the device LCD changes to “Online”
  4. Press the top left device button and select “Power-Off.”
  5. If a newer firmware has been released, your LiveShell 2 will automatically update the firmware.
    Note: Do not unplug the AC adapter or remove the batteries while the firmware is being updated.

How to update using Dashboard

    1. Connect the AC adapter to the LiveShell 2.
    2. Open Dashboard.
    3. If there is a new firmware update,  an update notice will be displayed.

    1. Click “Update now.”

    1. Read the update warnings and click “Update.”

  1. Your LiveShell will begin to automatically update the firmware and will reboot.
    Note: Do not unplug the AC adapter or remove the batteries while the firmware is being updated.
  2. The status after rebooting is set by “After Online” settings. (The default is ” Auto Broadcast “)

Release Notes

Firmware Rev.3878 (2017.09.06)
Main Improvements
  • Fixed the problem that the AXIS IP camera compatibility function did not work.
  • Fixed RTSP description contents
  • Fixed the problem that the battery would drain when the AC adapter was removed during rebooting.
  • Fixed the problem that LiveShell 2 could not receive RTMP Acknowledgment Message and streaming distributionFixed the problem that LiveShell PRO could not receive RTMP Acknowledgment Message and streaming distribution, for example to Wowza Streaming Engine, stops. stops.
Firmware Rev.3846 (2016.12.02)
Main Improvements
  • Fixed the problem that a higher value than set is displayed as frame rate in RTSP mode.
  • Fixed the problem that a false Wi-Fi profile “Wi-Fi#10” appears when deleting a registered Wi-Fi profile.
  • Fixed the problem that “DNS error” occurs when LiveShell 2 is offline in RTSP mode then immediately restarts live streaming.
    Fixed the problem that in local mode an unexpected number is displayed.
  • Added support for Huawei E3131s-2 USB modem (12d1:1f01/14db) and Docomo L-03F USB modem.
  • Fixed issue where the alert message,”Please use a keyframe frequency of four seconds or less”, is shown in the YouTube Live control room even if required frequency is already set.
  • Fixed the problem that LiveShell 2 does not connect to Dashboard when name resolution fails.
  • Fixed the problem that LiveShell 2 hangs while stopping live stream when the device displays “Synchronizing Dashboard” or error messages.
  • Fixed the problem that LiveShell 2 does not accept commands to restart or to go offline when stopping live streaming while the device displays “Synchronizing Dashboard”.
  • Icons now immediately disappear when LiveShell 2 goes offline.
  • Added support for vertical crop 9:16 aspect ratio.
Firmware Rev.3780 (2016.05.10)
Main Improvements
  • Fixed the problem that LiveShell 2 cannot accept video and audio correctly from some HDMI sources.
Firmware Rev.3779 (2016.04.16)
Main Improvements
  • Fixed the problem that video is blank for the first several seconds after starting RTSP livestreaming.
Firmware Rev.3776 (2016.02.25)
Main Improvements
  • Fixed the problem that LiveShell 2 cannot update some RTSP livestreaming settings.
  • Fixed the problem that LiveShell 2 sometimes does not work properly during RTSP livestreaming.
  • Added support for 4G LTE/USB adapter (Huawei E3131s-2).
  • Fixed the problem that LiveShell 2 sometimes cannot send audio packets during RTSP livestreaming.
Firmware Rev.3739 (2015.12.03)
Main Improvements
  • Added a menu to show Wi-Fi MAC address.
  • Added changes to support LTE USB modem.
  • Fixed the problem that LiveShell 2 cannot update some USB modem settings.

Reset/Initialize

Reset

Note: The LiveShell 2 should only be reset when it is not in the normal operating mode.

  1. Press and hold the power upper left side and the lower right buttons at the same time for 5 seconds.
  2. The LiveShell 2 is now turned off.

Initialize (Factory Reset)

  1. Once the display states that the LiveShell 2 is offline, press the button at the top right.
  2. Select “Initialize” by pressing the lower left button.  Press the top right button and display initializing screen.
  3. Select “Yes” by pressing the lower right button and go to initialize by pressing the top left button.

Note: The firmware version will remain the same even after initialization.

 How to initialize LiveShell 2

LiveShell 2 can be initialized following the instructions below.

1. Make sure the home screen is displayed on the device. The home screen has a power icon and a spanner icon.
a

2. Press the upper right button and go to “Configuration”.
b
c

3. Select “Initialize” by pushing the lower right or left button. Then Press the upper right button.
d
e

4.Select “Yes” by pushing the lower right or left button.
f

5. Push the upper right button to initialize.
g

How to check DHCP static IP address

Wired LAN

  1. Make sure the offline home screen is displayed on the device. The home screen has a power icon and a spanner icon.
    a
  2. Press the upper right button and go to “Configuration”.
    b
    c
  3. Select Network and press the upper right button.
    h
  4. Select “Ethernet” and press the upper right button.
    i
  5. “DHCP” or “Static Adress”will be displayed on the device screen and the one displayed is the current setting.
    After selecting DHCP or static address, press the upper left button.
    j

Wireless LAN

  1. Make sure the offline home screen is displayed on the device. The home screen has a power icon and a spanner icon.
    a
  2. Press the upper right button and go to “Configuration”.
    b
    c
  3. Select Network and press the upper right button.
    h
  4. Select “Wi-Fi #x”(“Wi-Fi #1” is the 1st priority connection) and press the upper right button.
    k
  5. Select “Address Type” and press the upper right button.
    l
  6. “DHCP” or “Static Adress”will be displayed on the device screen and the one displayed is the current setting.
    After selecting DHCP or static address, press the upper left button.
    j

Local mode setup issues

Local mode can be used to broadcast to a closed local network following the steps written on this page.

If setup is not successful please check the below guide.

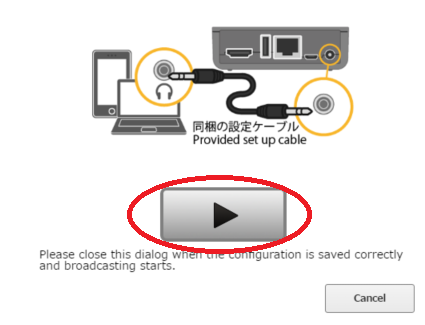
The Play button is shown on the setup page but nothing happens after clicking it.
b

<Point 1 >
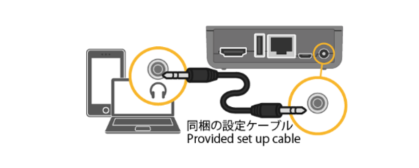
Please check if the PC or smartphone audio out and LiveShell 2 MIC-IN are connected securely using the included setup cable.

Setup information is sent via sound from the PC or smartphone to LiveShell 2 and can fail if there is not a secure connection.
c

<Point 2>
Please check if the PC or smartphone is set to max volume

Setup information is sent via sound from the PC or smartphone to LiveShell 2 and setup may fail if the PC or smartphone volume level is too low or muted. We recommend that the PC or smartphone is set to max volume before pressing the play button on the setup page.

<Point 3>
Please check the PC or smartphone is not playing any other audio

LiveShell 2 cannot receive the correct setup information if the PC or smartphone is playing any other audio as setup information is sent as sound.

If you cannot solve the problem

Please contact our support team (support-global@cerevo.com) and include the following information.

  • That you have already checked the points above.
  • The current firmware version of your LiveShell 2
  • Which brower (Internet Explorer, Google Chrome, Firefox etc.) and version you are using.
How to check the current LiveShell 2 firmware version

From the device display

1. Make sure the home screen is displayed on the device. The home screen has a power icon and a spanner icon.
a
a

2. Push the lower right button once or several times (the number of times will vary depending on the broadcasting situation).
b

3.”Rev.XXXX” will be shown on device display and this is the current firmware version.
c

From Dashboard

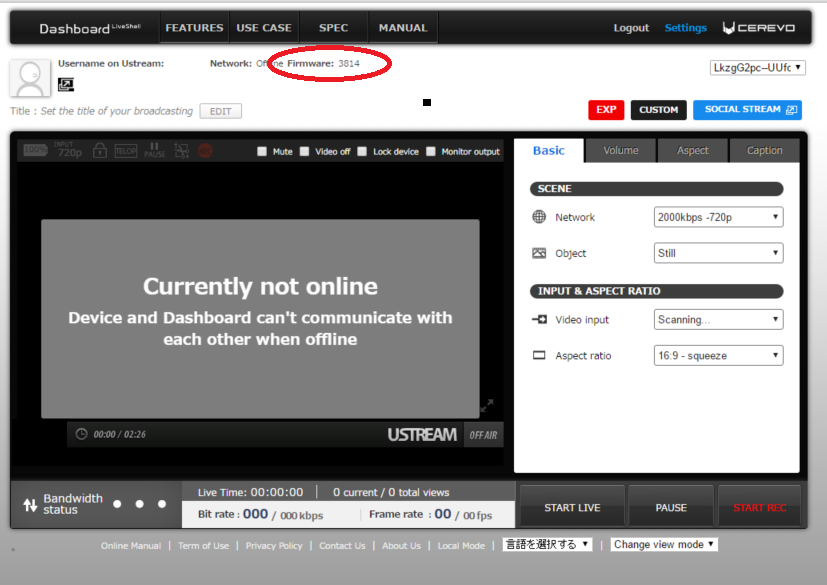
The current firmware version is shown on Dashboard.
SnapCrab_Dashboard LiveShell PRO - Google Chrome_2016-7-7_14-32-18_No-00