LiveShell X

2-1e. YouTube Live for live events (initial setup)

To live stream via YouTube Live with LiveShell X

You will first need to create a YouTube (Google) account and complete the confirmation procedures on the YouTube web site.

As of March 2016 there are two ways to live stream with YouTube Live, [Stream now] and [Events]. The [YouTube Live] preset menu in Dashboard is for live streaming using [Events]. If you would like to use [Stream now], you will need to select [Other broadcasting services] from the setup menu and enter server information, see section 2-1c for more details.

To Register for YouTube Live Streaming

  • Create your channel and verify your account.
  • Use a phone number not verified with other YouTube accounts twice or more within a year.
  • Confirm that your channel is in good standing*.

*See [Keep your YouTube account in good standing] for more information (external web page).

Note : We are unable to offer any help regarding your YouTube account, please visit the YouTube help forum if you are having problems (external web page).

Setup steps

  1. Access http://shell.cerevo.com/login and sign in to Dashboard.
  2. Select “LiveShell X” from the device list.
    select_ub250
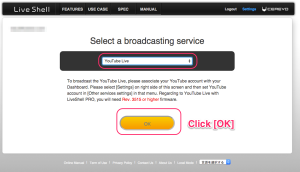
  3. Select [YouTube Live] and click the [OK] button.
    ub200_en_cap_youtubeinitsetup01
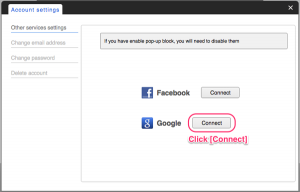
  4. If you login to Dashboard with a Cerevo account or Facebook account you will need to authorize your Google account to access Dashboard. Press the [Connect] button and proceed with Google Authentication. Once complete, re-select [YouTube Live] and click the [OK] button.
    ub200_en_cap_googleaccountcoordinate
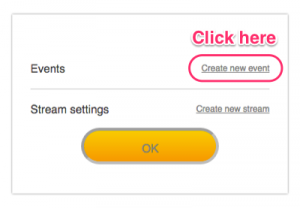
  5. Click [Create new event] and enter event information.
    ub200_en_cap_youtubeinitsetup02
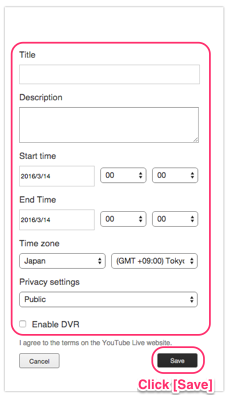
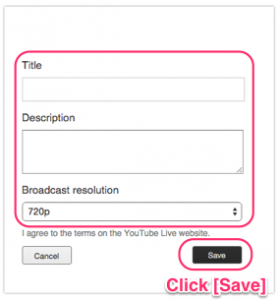
  6. You can set these basic items from Dashboard, advanced settings can be set on the [Events] page in YouTube. Click the [Save] button to continue.
    ub200_en_cap_youtubeinitsetup03
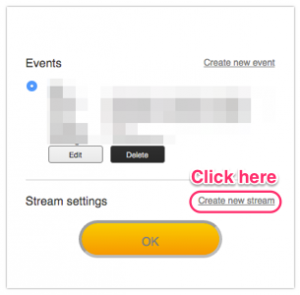
  7. Click [Create new stream], set the resolution and click [Save].
    ub200_en_cap_youtubeinitsetup05
    ub200_en_cap_youtubeinitsetup04
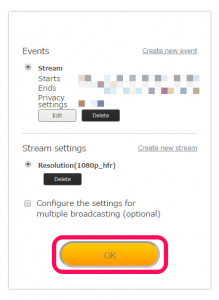
  8. Click the [OK] button after setting both event and stream information.
    ub250_youtubelive_event
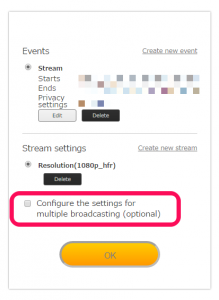
    1. If you want to setup multiple broadcasting, select the checkbox.
      ub250_youtubelive_multiple_broadcasting
    2. Set the other channel information and click the [OK] button.
      ub250_multiple_broadcasting_other_channel
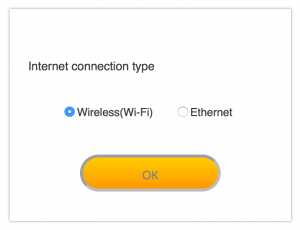
  9.  Select an internet connection type and click the [OK] button.
    ub250_select_internet_connect_type
  10.  Proceed to step 2-2.

2-1f. Facebook Live (initial setup)

  1. Access http://shell.cerevo.com/login and sign in to Dashboard.
  2. Select “LiveShell X” from the device list.
    select_ub250
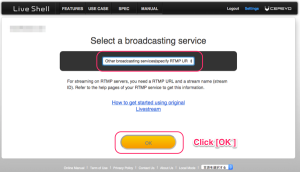
  3. Select [Other broadcasting services] and click [OK].
    ub200_en_cap_initotherssetup01
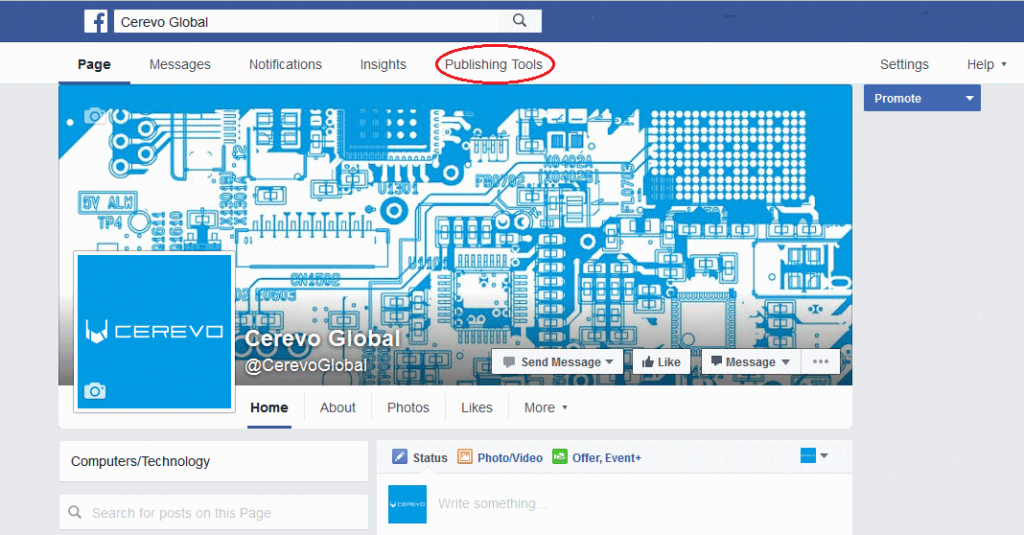
  4. Open a browser window, login to your Facebook account, go to your managed page and click on [Publishing Tools] in the page controls menu.
    fblive1a
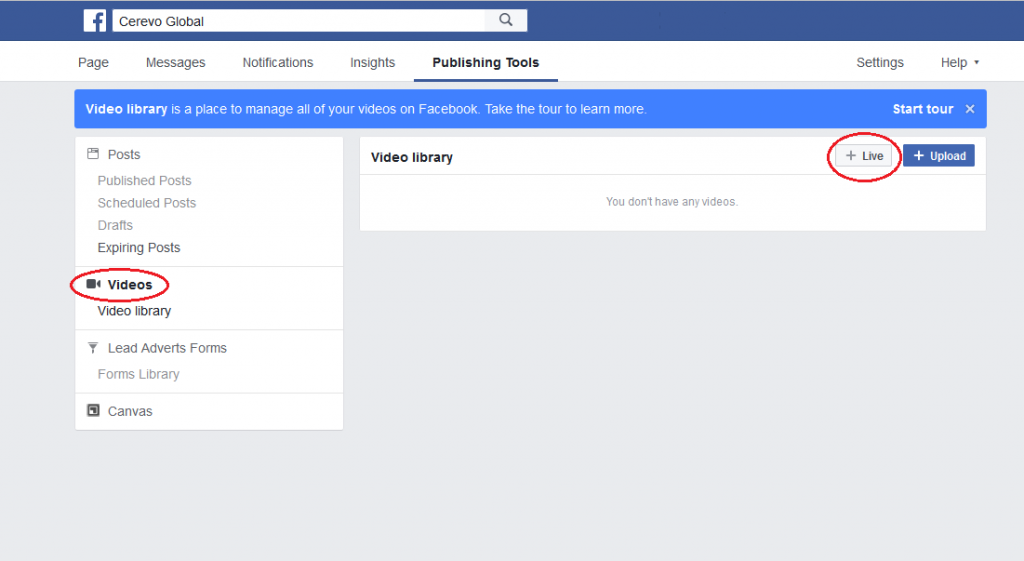
  5. On the publishing tools screen click [Videos] on the left hand menu then click the [+Live] button.
    fblive2
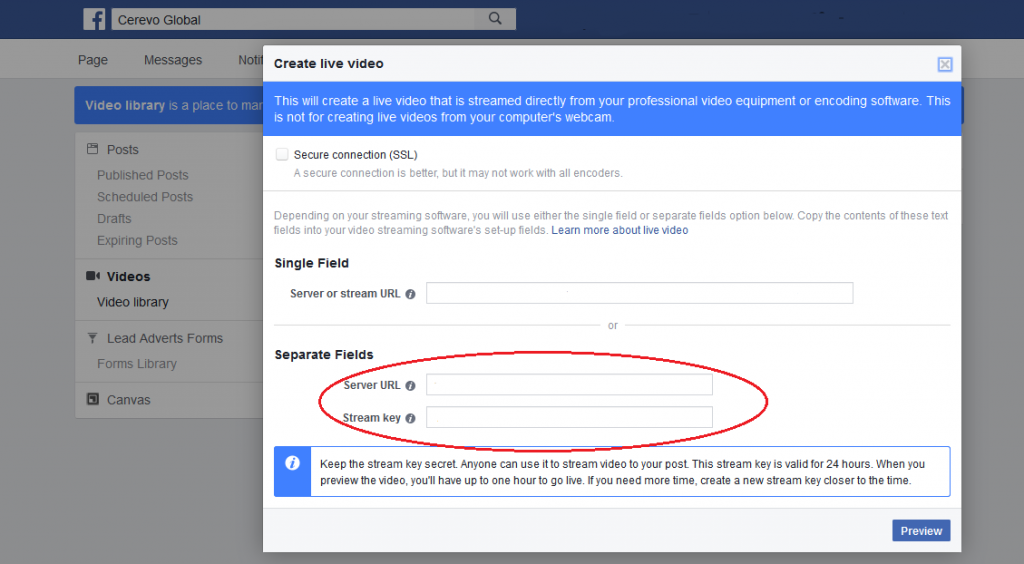
  6. On the Create live video window, make a note or copy the [Server URL] and [Stream key] fields.
    fblive3
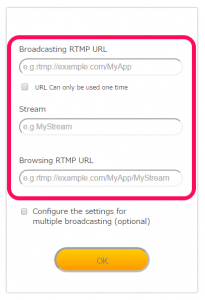
  7. Return to LiveShell Dashboard and enter the RTMP server information from Facebook as follows –
    Server URL>Broadcasting RTMP URL
    Stream key>Stream
    Leave [Browsing RTMP URL] blank, then click the [OK] button.
    ub250_other_account
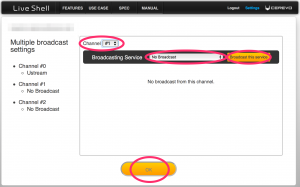
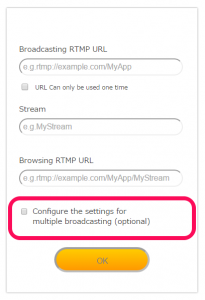
    1. If you want to setup multiple broadcasting, select the checkbox.
      ub250_other_multiple_broadcastiong
    2. Set the other channel information and click the [OK] button.
      ub250_multiple_broadcasting_other_channel
  8.  Select an internet connection type and click the [OK] button.
    ub250_select_internet_connect_type
  9.  Proceed to step 2-2.

2-1g. Twitch (initial setup)

Currently, due to a specification change on the platform side, only live-streaming via RTMP URLs, etc. is possible.
We will inform you of the normal live-streaming method as soon as it is available.
▶︎How to live-streaming at RTMP URLs

Please complete user registration on Twitch before proceeding with these steps.

  1. Access http://shell.cerevo.com/login and sign in to Dashboard.
  2. Open another browser window or tab and log in to Twitch.
  3. Select “LiveShell X” from the device list.
    select_ub250
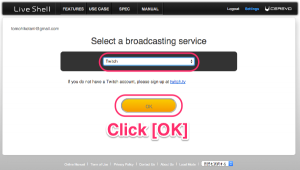
  4. Select [Twitch].
    ubx_en_cap_twitchsetting01
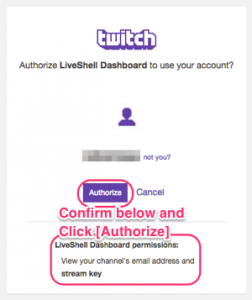
  5. You will see a pop-up window asking you to authorize Dashboard to use your Twitch account, click the [Authorize] button.
    ubx_en_cap_twitchsetting02
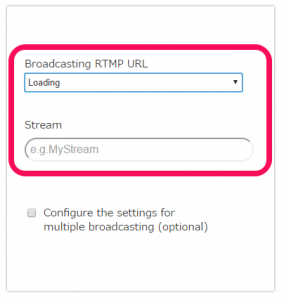
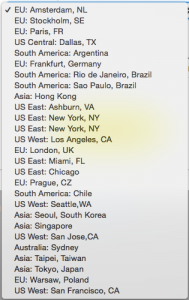
  6. Dashboard will automatically insert streming information (Stream), you need to change the [Broadcasting RTMP URL] to your nearest location.
    ub250_twitch_account
    ubx_en_cap_twitchsetting04
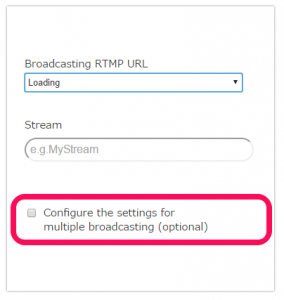
    1. If you want to setup multiple broadcasting, select the checkbox.
      ub250_twitch_multiple_broadcasting
    2. Set the other channel information and click the [OK] button.
      ub250_multiple_broadcasting_other_channel
  7.  Select an internet connection type and click the [OK] button.
    ub250_select_internet_connect_type
  8.  Proceed to step 2-2.
  9. After completing section 2-3. Network settings, you will see the Dashboard main panel, however due to Twitch restrictions you cannot see a preview on your Dashboard. Bitrate, resolution and all other settings can still be controlled via Dashboard. To see a preview, please go to the Twitch Dashboard (https://www.twitch.tv/dashboard).

2-2. Cable connection and power on

  1. Insert the AC adapter cable into the AC port located on the back of the LiveShell X device.
  2. Connect your video camera/device via a HDMI cable.
  3. For Ethernet: Connect the ethernet cable.
    For Wi-Fi: Make sure that the USB WiFi adapter is connected.
  4. Press and hold the power button for five seconds to power on.
  5. Select the language using the arrow buttons to scroll through the choices. Press the top right button to confirm your selection.
  6. Proceed to Ethernet Set Up or Wi-Fi Set Up.

2-3a. Ethernet setup

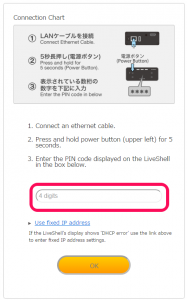
  1. Follow the setup instructions in Dashboard.
  2. Check the PIN displayed in the unit’s LCD.
  3. Enter the PIN in Dashboard and click the [OK] button.
    ub250_register_ethernet
  4. The LCD will display [LIVE] and the Dashboard main panel will be displayed on your PC (or other device) when setup is complete.
    * For niconico Live you need to setup via the niconico web site, please refer to the niconico web page [Stream Live on Niconico!] for more details.
    * For RTSP server mode, please refer to RTSP server setup.

2-3b. Wi-Fi set up

  1. Follow the setup instructions in Dashboard.
  2. You will see a message on the unit’s LCD [Register me at s.cerevo.com.]
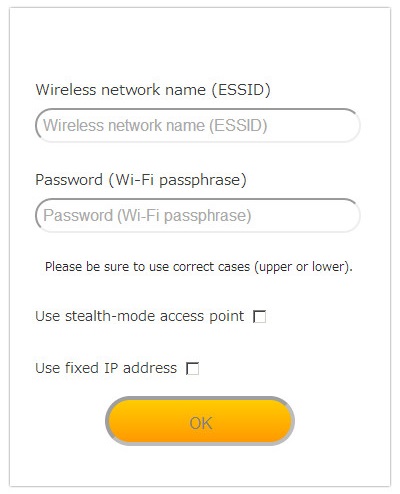
  3. Enter your Wi-Fi ESSID and Wi-Fi passphrase.
    setup-ust5-en
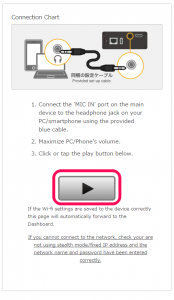
  4. Connect one end of the included setup cable to the [SET UP] port on the LiveShell X and connect the other end to the headphone jack of your device as depicted in the image below. Click the [Play] button.
    ub250_register_wifi
  5. The LCD will display [LIVE] and you will be able to see the Dashboard main panel on your PC (or other device) when setup is complete.
    * For niconico Live you need to setup via the niconico web site, please refer to [Stream Live on Niconico!] for more details.
    * For RTSP server mode, please refer to RTSP server setup.

2-4. Local Mode

Summary

In normal live streaming (live streaming not using Local Mode), the connection between Dashboard and LiveShell X is mandatory, and live streaming is not possible in situations where the Dashboard server and LiveShell X cannot communicate.
Therefore, in a local environment with no Internet connection, LiveShell X cannot communicate with the Dashboard server, so live streaming is not possible.

In contrast, Local Mode is a mode in which LiveShell X does not need to connect to Dashboard. Since LiveShell X does not connect to Dashboard, LiveShell X is not required to be connected to the Internet.

As a result, even if you do not have an Internet connection, you can still live stream with LiveShell X by setting up a live streaming server on your local network.

As Local Mode is a live streaming mode that does not communicate with Dashboard but also does not disconnect any other Internet connection, it is possible to stream to YouTube Live or other live streaming platforms in Local Mode.

If for some reason you are unable to connect to Dashboard and therefore cannot live stream, you can use Local Mode to live stream to YouTube Live or other live streaming services.

Main Use Cases
Live streaming on a local network environment with no Internet connection.
Omitting connection to Dashboard when live streaming is not possible due to being unable to connect to Dashboard.

How to Set Local Mode
There are three ways to set Local Mode.
1.Via Dashboard
2.Configuration via Cerevo website
3.Setup via the main unit
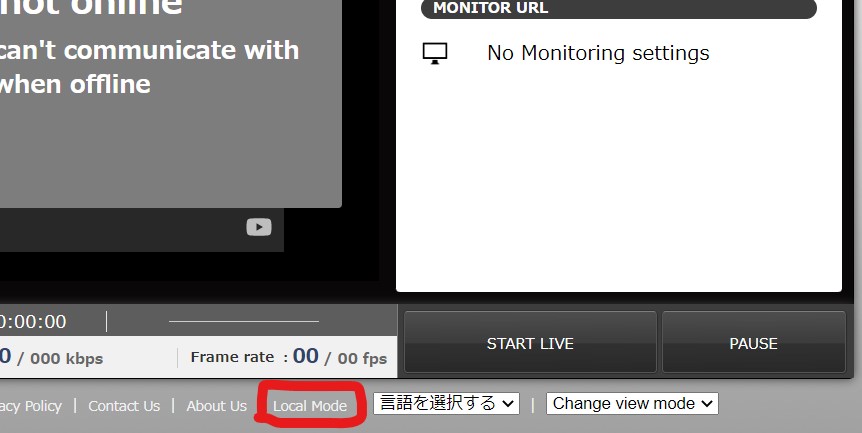
 

How to Setup via Dashboard

1. Access http://shell.cerevo.com/login. Local Mode does not use the Dashboard function, so login is not required.
2. Click on [Local Mode] in the footer to open the Local Mode settings page.
3. Select [LiveShell X] from [Device Type].
4. Select the connection type – Wireless LAN (Wi-Fi), Ethernet, etc., according to the network connection of your LiveShell X.
5. Please enter the necessary information according to each network connection environment. If you are using a fixed IP for wireless LAN (Wi-Fi) or Ethernet, check the “Use fixed IP” checkbox to display the entry field.

[Wireless LAN (Wi-Fi)]
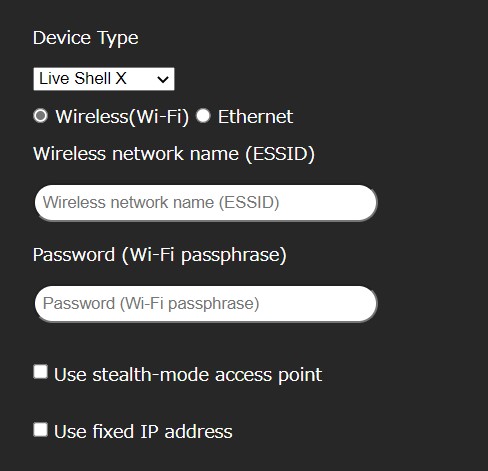


[Wired LAN]
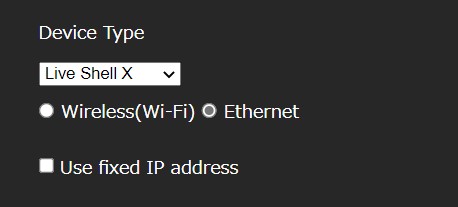


6. Select the channel you wish to stream to.
7. Select “RTMP”, “RTSP”, “Recording”, “MPEG-TS/UDP” or “No Live Settings” and enter the necessary settings.
8. Press the [OK] button.
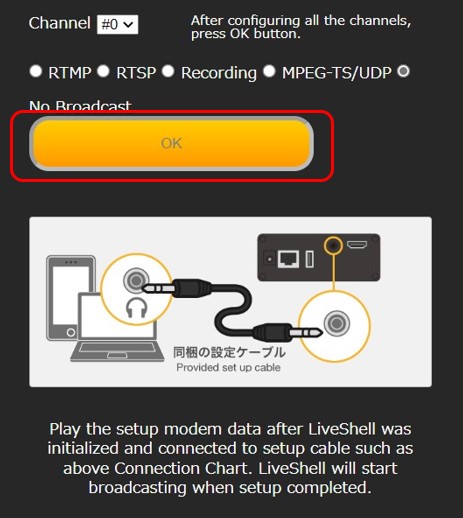


9. When the playback button for transferring setup information appears, connect the included set up cable as shown in the illustration from your PC to the LINE-IN of LiveShell X, and press the play button. When the setup data is successfully sent to LiveShell X, the LiveShell X device screen will show the new settings automatically.
*If a problem occurs, please check if the audio volume of your PC or other device is appropriate (maximum volume is recommended).

10. When setup has successfully completed, live streaming will start if you selected RTMP server or recording. If you selected RTSP server, LiveShell X will wait for a connection from the client application. If you go offline when in Local Mode, [Local Mode] will be displayed on the LiveShell X device screen.

How to Setup via the Cerevo Website
1. Go to https://ls-local.cerevo.com/
2. Under [Select the LiveShell device to use], select [LiveShell X].


3. Select the connection type such as wireless LAN (Wi-Fi), wired LAN, 3G/4G network, etc. according to the network connection environment of your LiveShell X.
4. If you use a fixed IP for wireless LAN (Wi-Fi) or wired LAN, select [Use fixed IP] to display the input field.

Wireless LAN (Wi-Fi)
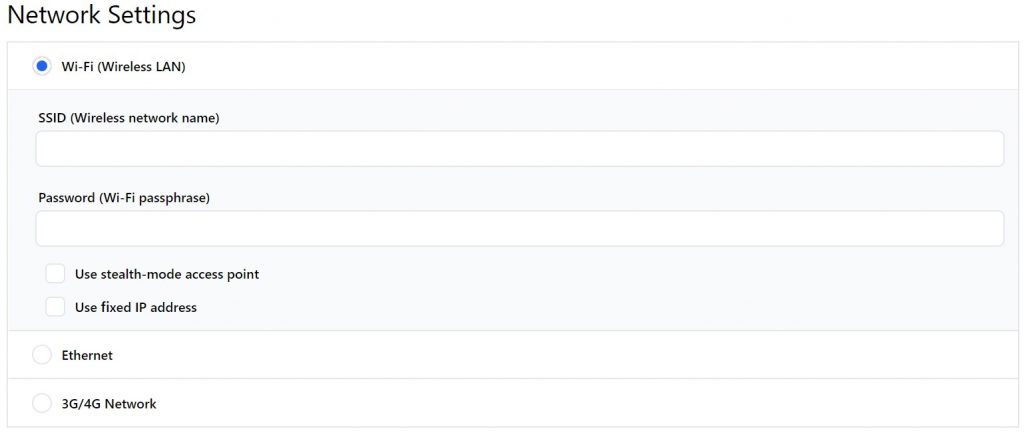
 

Wired LAN/Ethernet


5. Select the channel you wish to stream to.
6. Select [RTMP], [RTSP Server Mode], [Recording], [MPEG-TS/UDP] or [No Distribution Settings] and enter the necessary settings.
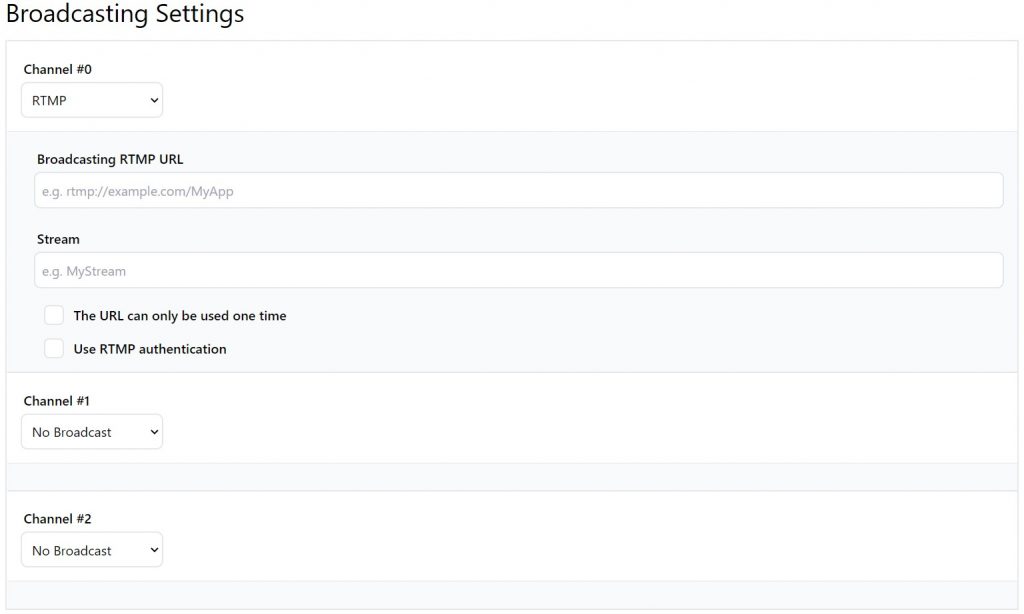
 

7. Click the [Next] button.

8. When the playback button for transferring setup information appears, connect the included set up cable as shown in the illustration from your PC to the LINE-IN of LiveShell X, and press the play button. When the setup data is successfully sent to LiveShell X, the LiveShell X device screen will show the new settings automatically.
*If a problem occurs, please check if the audio volume of your PC or other device is appropriate (maximum volume is recommended).
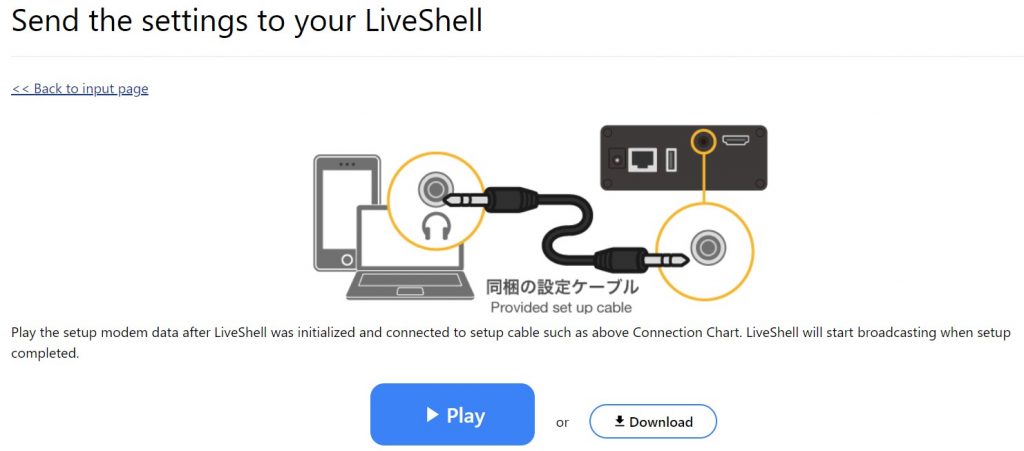
 

9. When setup has successfully completed, live streaming will start if you selected RTMP server or recording. If you selected RTSP server, LiveShell X will wait for a connection from the client application. If you go offline when in local mode, [Local Mode] will be displayed on the LiveShell X device screen.

How to Setup via the Main Unit

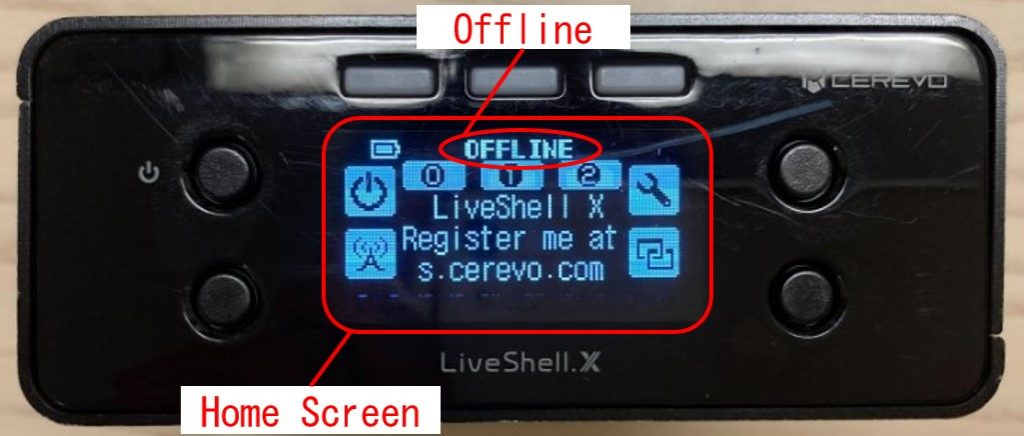
1. Make sure LiveShell X is OFFLINE and the Home screen is displayed on the OLED.
 

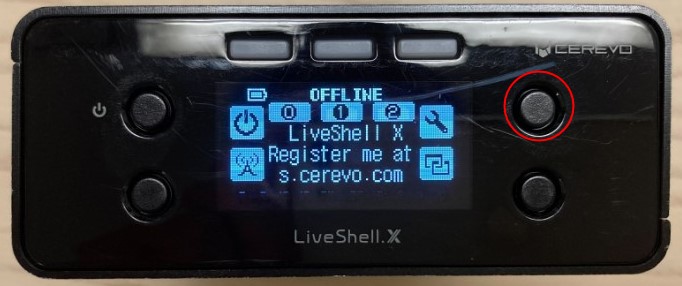
2. Push the upper right corner button and go to the settings menu. “Configuration” will appear if you are in the settings menu.
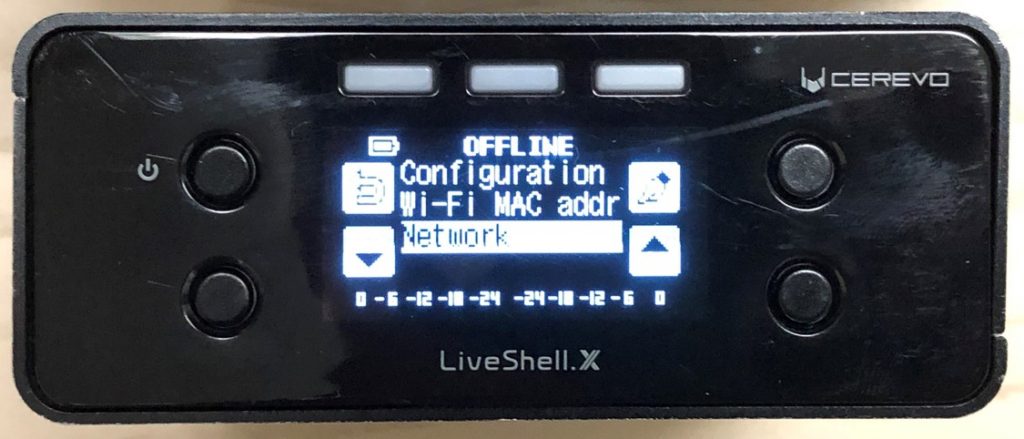


3. Move the cursor (▲ and ▼) by pushing the lower left or lower right button to select “Local Mode”, then press the upper right button to confirm.
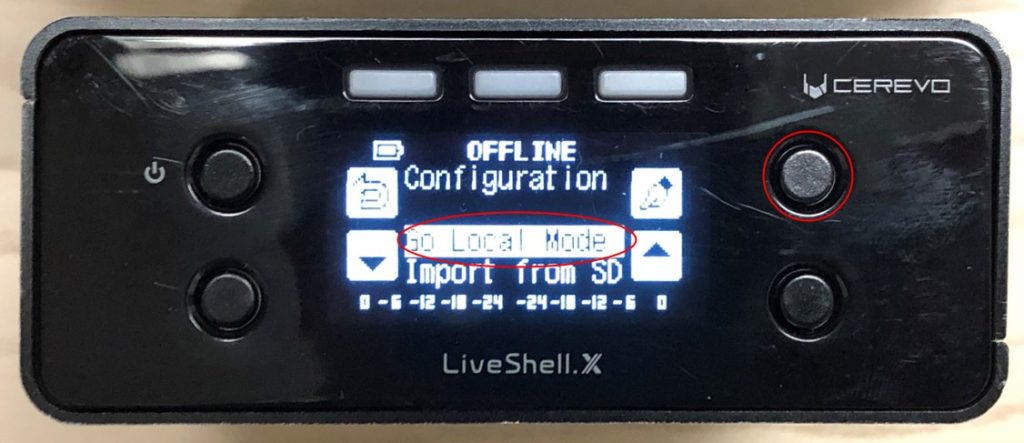
 

4. Move the cursor (▲ and ▼) by pushing the lower left or lower right button to select “Yes”, and press the upper right button to confirm.
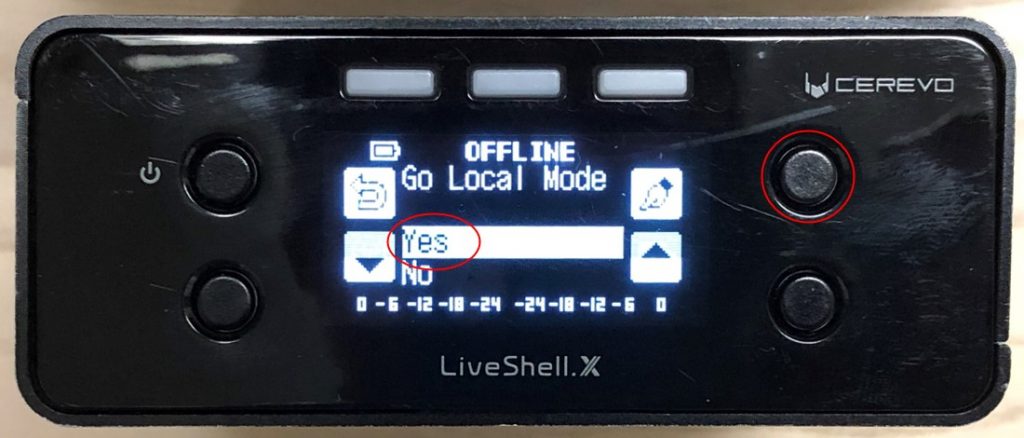
 

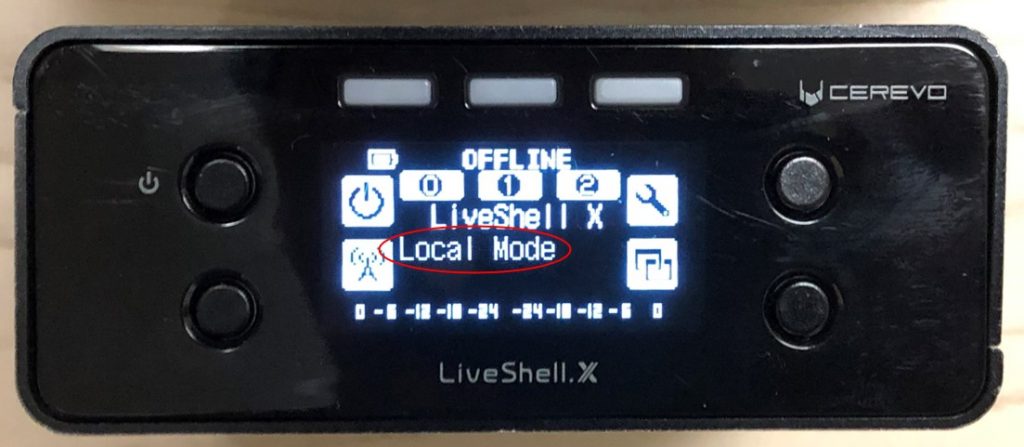
5. “Local Mode” will be displayed on the HOME screen when LiveShell X successfully switched to Local Mode.
 

To Disconnect Local Mode

1. Make sure LiveShell X is OFFLINE and the Home screen is displayed on the OLED.
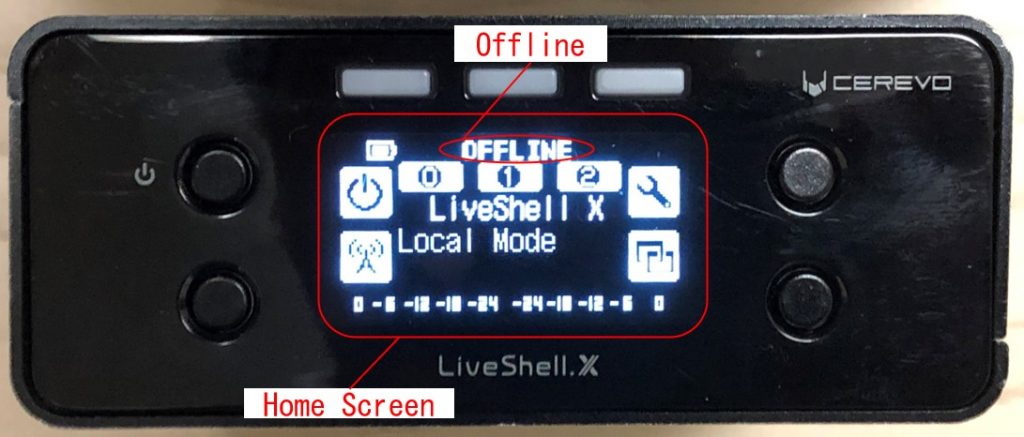
 

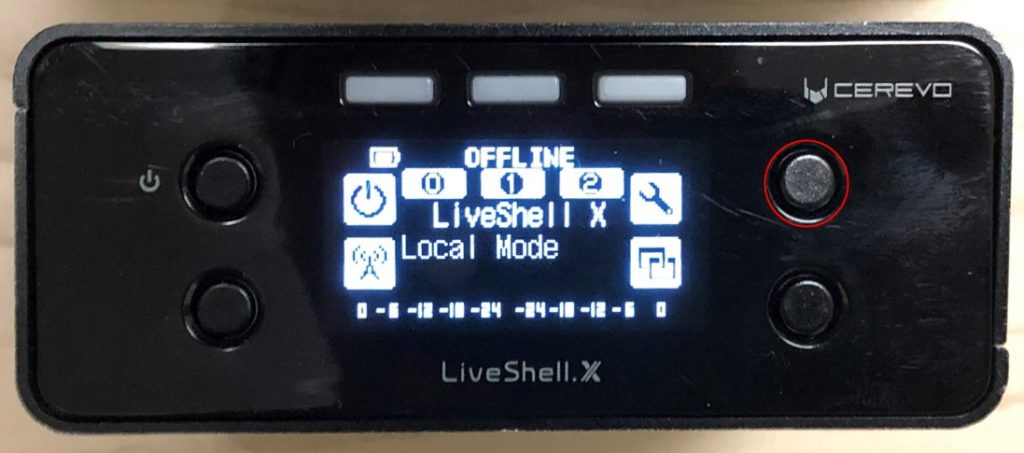
2. Push the upper right corner button and go to the settings menu. “Configuration” will appear if you are in the settings menu.
 

3. Move the cursor (▲ and ▼) by pushing the lower left or lower right button to select “Local Mode”, then press the upper right button to confirm.

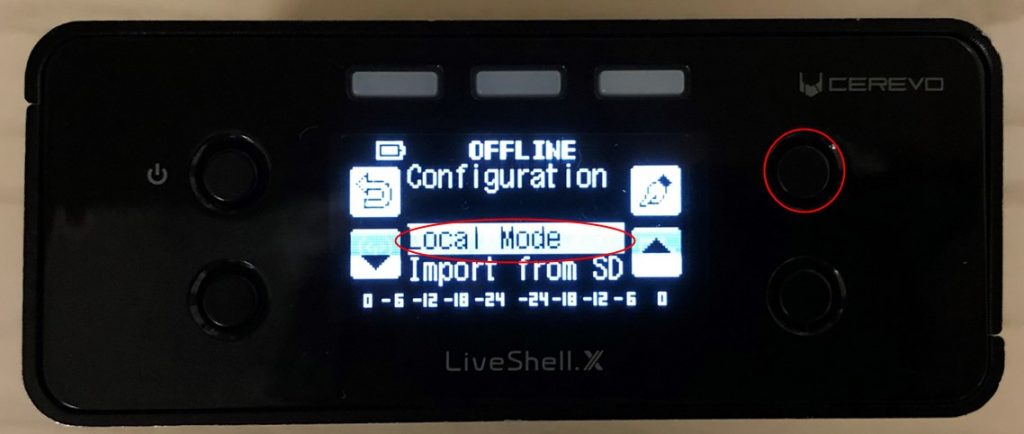


4. Move the cursor (▲ and ▼) to “Normal Mode” and press the upper right button to confirm.
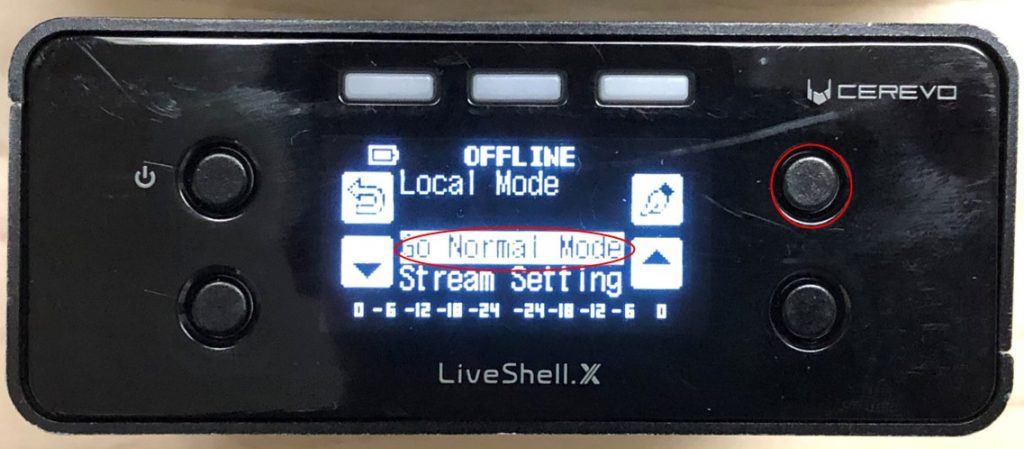
 

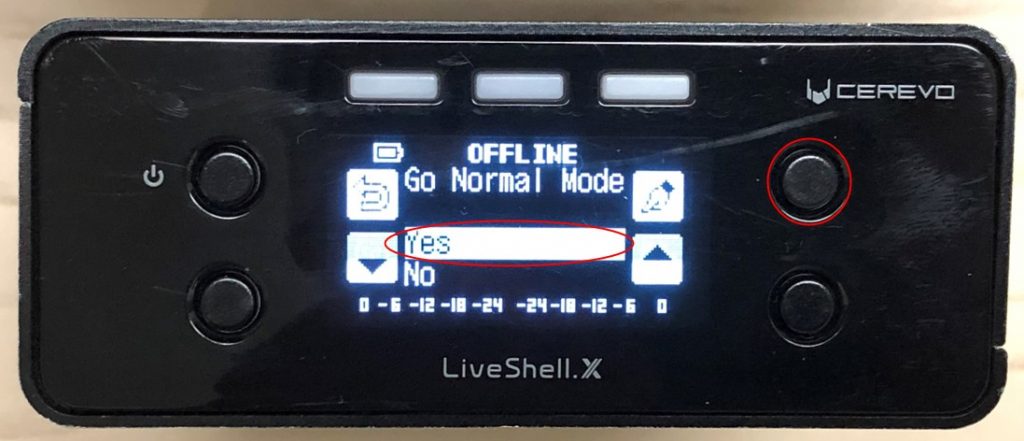
5. Move the cursor (▲ and ▼) to “Yes” by pushing the lower left or lower right button, and press the upper right button to confirm.
 

Loal Mode Disadvantage

Local Mode does not support Dashboard because it disables LiveShell X and Dashboard from communicating.

Greater functionality is available via TinyCon, but there are some functions that can only be performed via Dashboard and not via TinyCon (for example, the ticker function cannot be used via TinyCon).
3-1. Information on Dashboard

*The following example shows using Ustream to live stream, other streaming services may have different Dashboard options.

Top

ub250_dashboard_section

  1. Ustream account icon
  2. Ustream user name
  3. ESSID which the LiveShell X is connected to or Ethernet
  4. Installed firmware version
  5. Dashboard registered email address
  6. The Device ID (displayed when 2 or more devices are registered to a single Dashboard account)
  7. The Ustream channel name entered into the LiveShell X

Left side

ub250_dashboard_main

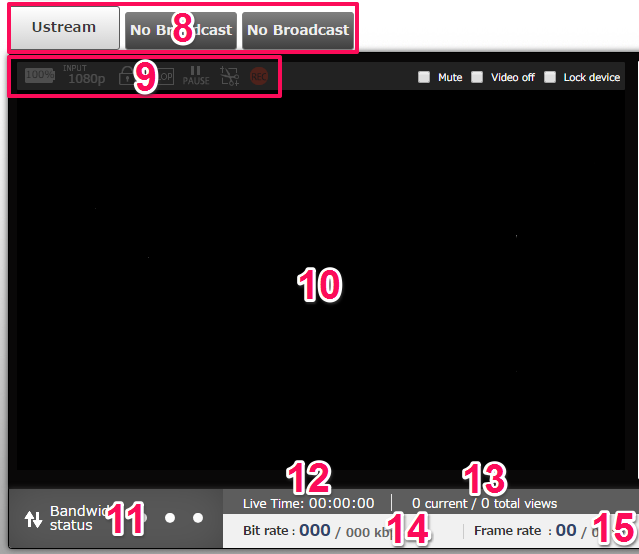
  • 8. The Channel
  • 9. Battery status, input resolution, key lock indictor, caption indicator, pause, crop, and recording status.
  • 10. Ustream player:  Selecting this area will open the Ustream video page.
    In the event of an error, the display will read: “[Currently not online].”
  • 11. Connection status
    Excellent No action required
    Good No action required
    Warning The bit-rate or frame-rate settings need to be adjusted
    Emergency The internet connection speed is slower than the current broadcast settings.
    The bit-rate or frame-rate settings need to be adjusted immediately.
    Dead Video has been cut off.  Adjust settings immediately.
    ・・・ Offline or no-response from LiveShell X
  • 12. Total time from the start of broadcasting
  • 13. Current viewers/total viewers
  • 14. Current video and audio bitrate
  • 15. Current video frame-rate

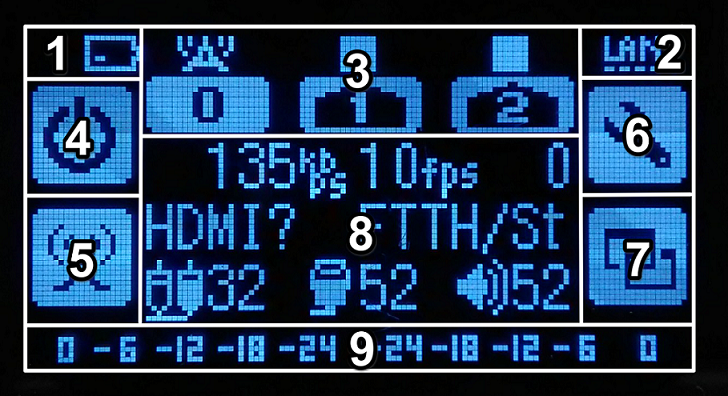
3-2. Device LCD guide

ub250_lcd_main_number

1. Battery
Battery level display. A plug icon appears when an AC adapter is used.
2. Wi-Fi or LAN
Wi-Fi reception status. An Ethernet icon appears when connected via Ethernet.
3. Broadcasting status
While the channel is broadcasting, the radio tower mark appears above that channel. If the channel is not broadcasting, the square mark will appear.
4. Top left button
Offline: Power ON/OFF
Online: Keylock, Offline
5. Bottom left button
Start, pause and stop broadcasting.
6. Top right button
Broadcasting settings.
7. Bottom right button
Switch information displayed in 8.
8. Information
While LiveShell X is online:
  • (Default) Current bit rate of broadcasted video and sound, current queue value, video image input, current frame rate, streaming quality, stereo AV-in volume, HDMI volume, master volume.
    ※Streaming quality is shown as “Custom” when that option is selected. When using the preset option, the internet speed streaming mode will be as described below.

    over 2000kbps – 720p FTTH
    over 800kbps – 480p ADSL
    over 500kbps – 360p 3GHi
    over 300kbps – 216p 3GLo
    still mode St
    moving mode Mv

    i.e.”over 2000kbps” and “still mode” will be shown as “FTTH/St”.

  • When using Ustream – the number of viewers, page URL, channel title. With other services – the service name or type.
  • Firmware version, device ID
  • RTSP server URL

While offline:

  • (Default) s.cerevo.com
  • Firmware version, device ID
  • Ethernet MAC address
9. Peak meter (6dB scale)
※when a peak meter is achieved on both ends, there is a 0dB under clipping. The status bar extends, warning users.
If neither bar is displayed, there is a -6dB~0dB under clipping. Below this is as follows: -12dB~-6dB.
When the maximum sound is not clipped, please adjust the bars to extend inside the meter.

3-3. Status Lamp

The 3 status LED buttons on the front of the LiveShell X indicate broadcasting status by color.

While the power is off:

  • Green left button
    The AC adapter is connected but does not need to charge.
  • Red left button
    The AC adapter is connected and charging.
  • Red light on all buttons
    The AC adapter is connected, but the LiveShell X is not charging because of a battery error.
  • Yellow right button
    The AC adapter is connected, but the battery is not inserted.

While the power is on:

  • Blue light
    Streaming data queue is under 32 (recommended for optimal streaming).
  • Green blinking light at intervals of 4 seconds
    Streaming data queue is 32 – 63 during broadcasting.
  • Yellow blinking light at intervals of 4 seconds
    Streaming data queue is 64 – 95 during broadcasting.
  • Yellow blinking light at intervals of 2 seconds
    Streaming data queue is 96 – 127 during broadcasting.
  • Red blinking light at intervals of 2 seconds
    Streaming data queue is 128 during broadcasting.
  • Red blinking light at intervals of 1 second
    Wi-Fi adapter or the ethernet cable has been detached during broadcasting.
  • Yellow blinking light at intervals of 0.5 seconds
    Very low battery.
  • White light
    Recording