LiveShell X

5-11. MPEG-TS/UDP settings

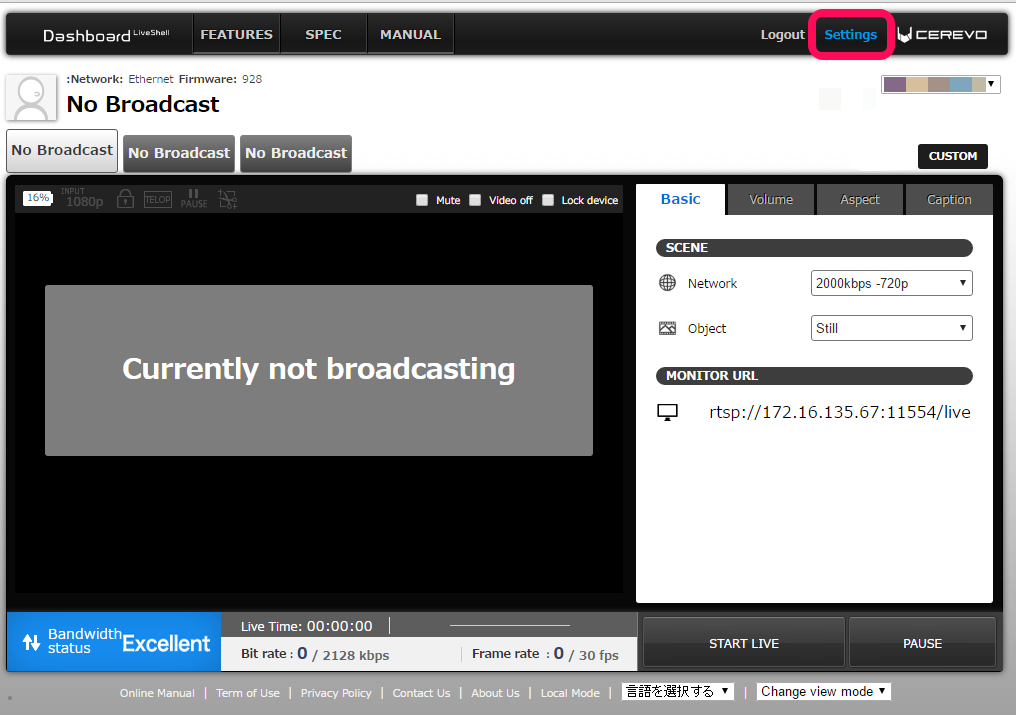
  1. Click “Settings” on the top right of Dashboard.
    ub250_dashboard_add_network
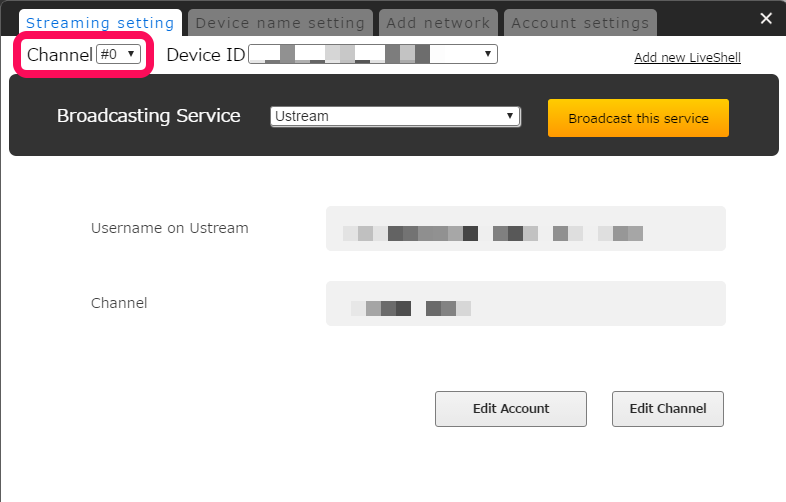
  2. Select the channel you want to setup.
    ub250_select_channel
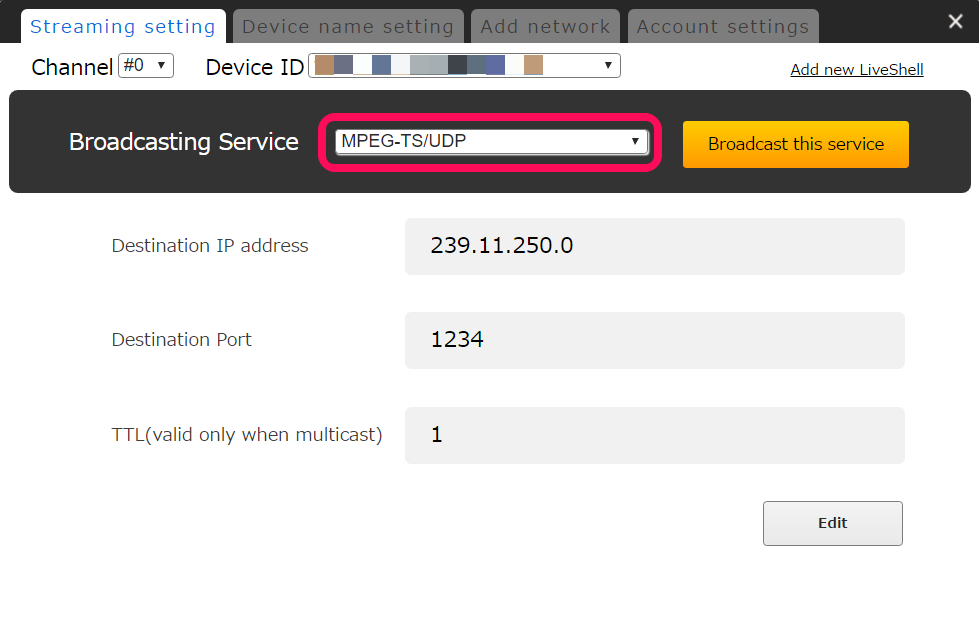
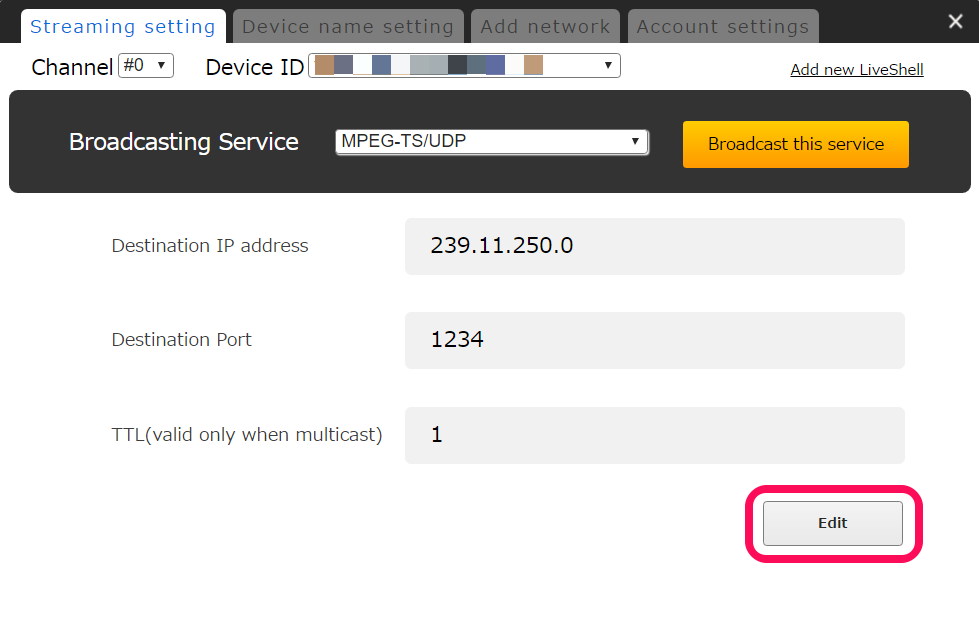
  3. Select [MPEG-TS/UDP] from the pulldown list of Broadcasting Services.
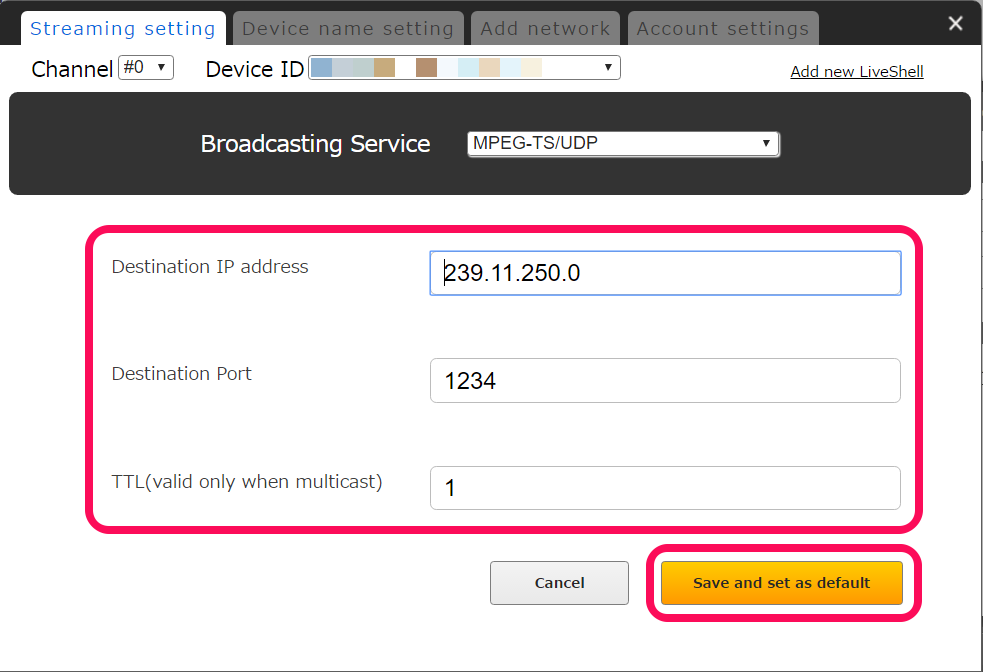
  4. If you want to change settings, click the [Edit] button.

Note

  • If a class D address is specified, it becomes multicast. Please use 239.0.0.0 ~ 239.255.255.255. The default address is as follows.
    • #0: 239.11.250.0
    • #1: 239.11.250.1
    • #2: 239.11.250.2
  • The default port number is “1234”.
  • TTL should be larger than the number of routers through which the multicast packet passes.
    (When distributing to a local network, TTL should normally be set to “1”.)
  • When viewing multicast video in VLC, please add “@” before the IP address in the URL.
    Ex: udp://@239.11.250.0:1234

TinyCon

An overview of TinyCon

You can remotely control LiveShell X using TinyCon.
Dashboard can not be used in local mode, but TinyCon can be used in both normal mode and local mode.
As TinyCon can also be used in normal mode, LiveShell X has flexible control options.

*Rev.1037 or later firmware is required to use TinyCon.

How to use TinyCon (initial setup)

  1. Turn on LiveShell X and make sure it is in offline mode.
  2. Push the upper right button and select “Configuration” > “TinyCon” > “Enable TinyCon” > “Yes”.
  3. Bring the unit online (you can also use TinyCon on the local mode).
  4. Check the IP address of LiveShell X and access “http://(IP address):11250”.
  5. When basic authentication is enabled, the user name will be “LSXTC” and the password will be the six digit number you set (default is “000000”).

How to use TinyCon (after initial setup)

  1. Bring the unit online (you can also use TinyCon in local mode).
  2. Check the IP address of LiveShell X and access “http://(IP address):11250”.
  3. When basic authentication is enabled, the user name will be “LSXTC” and the password will be the six digit number you set (default is “000000”).

How to stop TinyCon

  1. Turn on LiveShell X and make sure it is in offline mode.
  2. Push the upper right button and select “Configuration” > “TinyCon” > “Enable TinyCon” > “No”.

TinyCon optional settings

  • “Enable Auth.”: Basic authentication can be applied when accessing TinyCon.
  • “Display Password”: You can check the password of the current basic authentication.
  • “Change Password”: You can choose either a randomly generated 6-digit number or “000000”.

TinyCon settings

Audio

  • Mixer
    • Master: Master volume
    • HDMI: HDMI volume
    • LINE: LINE-IN volume
  • Channel (#0 / #1)
    • Bitrate: Audio bitrate
    • Channel: Channel number

Video

  • Basic (#0 / #1 / #2 / #3)
    • State: Current broadcasting status
    • Error: Current error
    • Bitrate: Current total bitrate
    • Framerate: Current framerate
    • Queued frames: Current broadcasting queue length
    • Mute: Mute on/off
    • Audio stream: Audio stream channel you set
    • Video mute: Video display on/off
    • Video delay: Audio and Video synchronization adjustment
    • Auto control(Except #3): Auto control setting
  • Quality (#0 / #1 / #2 / #3)
    • Preset: Broadcasting quality preset
    • Video bitrate: Video bitrate average
    • Height: Vertical resolution
    • Framerate: Framerate average
    • IDR frame interval: IDR frame interval
    • H.264 profile: H.264 profile
    • H.265 for RTSP|UDP|REC: Video codec (“Disable” is H.264. “Enable” is H.265.)
    • VFR: Variable framerate mode (“Disable” is variable image quality mode. “Enable” is variable framerate mode.)
    • Min bitrate: Minimum bitrate
    • Queue length: Broadcasting queue length
  • Aspect|Crop (#1 / #2 / #3)
    • Preset: Aspect ratio preset
    • Overscan ratio: Overscan ratio
    • Manual aspect ratio: Manual aspect ratio
    • Manual crop (x,y,w,h): Manual crop (x-origin, y-origin, width, height)
  • Ustream (#0 / #1 / #2)
    • Record: Record setting
    • Recording: Current recording status
    • Viewer: Current viewers
    • Total viewer: Cumulative viewers
  • Target (#3)
    • Cast mode: Unicast / Multicast

Misc

  • Misc
    • Screen saver time: Screen saver time setting
    • LED brightness: LED brightness setting
    • Offline-REC container: Offline-REC container setting
    • Key lock: Key lock setting
  • Status
    • HDMI video mode: HDMI video input
    • HDMI SPD: HDMI Source Product Description
    • microSD free area: microSD card usable space
    • Device ID: Device ID
    • Battery: Battery charging state
  • Sub
    • Sub (x,y,z,URL): Caption image (x-origin, y-origin, z is 0, image URL: “http://~”)
    • Video mute image (URL): Pause image (image URL: “http://~”)

Targets( Local mode only)

  • Channel(#0 /#1 /#2)
    •  service
      • null: No broadcasting settings
      • rtmp: Other broadcasting services
        • type
        • url
        • stream
        • agent
        • username
        • password
        • onetime
      • rtsp: RTSP server
        • type
        • mcast
        • port
      • file rec.: Recording
        • type
        • format
      • udp: MPEG-TS/UDP
        • type
        • address
        • port
        • ttl

Export | Import

  • Status
    • Export : Export a setting file
    • Import : Import a setting file
  • Targets
    • Export : Export a file to set broadcasting service
    • Import : Import a file to set broadcasting service

Power

  • Offline
  • Power off
  • Reboot

Note

  • For broadcasting to RTMP server, you can not input URL other than RTMP such as RTMPS.

Using 3G/4G USB modems

LiveShell X officially supports the following 3G/4G modems.

Rev.977 or later

  • D-Link DWM-221 – Revision B
  • NTT docomo L-03D
  • ZTE MF-820
  • Verizon U620L(※)
  • Huawei E3131i-2(※)
  • Huawei E3372(※)
  • PIXELA PIX-MT100(※)

*USB modems with the (※) mark have their own setting page, which is not Cerevo Dashboard.
Please check the manual for your USB modem to confirm how to set APN information and access the settings page to set APN information before using with LiveShell X.

*Please be noted that we are unable to test every variant of each modem so there may be compatibility issues with some variants.

Does LiveShell X support RTMPS?

LiveShell X, LiveShell 2 and LiveShell PRO all support RTMPS.

In cases where you want to use RTMPS, enter the URL starting with “rtmps://” in the URL entry box.

Can not broadcast to Akamai or Akamai hosted (Dacast etc.) services

When broadcasting to Akamai or Akamai hosted (Dacast etc.) services Dashboard may show an incorrect or very low bitrate.

If you are having issues broadcasting to Akamai or Akamai hosted (Dacast etc.) services with your LiveShell X, please try the following workaround –

  • Access the Dashboard Custom Settings screen
  • Set the H.264 Profile option to either baseline or main and test again.

Supported broadcasting services

Broadcasting services Setup Panorama Mode Support
YouTube Live Select from the “Broadcasting Service” menu
Niconico live Select from the “Broadcasting Service” menu
Twitch Select from the “Broadcasting Service” menu
Ustream Select from the “Broadcasting Service” menu
Facebook Live Select from the “Broadcasting Service” menu
FRESH! by AbemaTV Select from the “Broadcasting Service” menu
TwitCasting Select from the “Broadcasting Service” menu
LINE LIVE Select from the “Broadcasting Service” menu
SmartSTREAM Use “Other broadcasting service settings (RTMP)”
SHOWROOM Use “Other broadcasting service settings (RTMP)”
J-Stream Equipmedia Live Edition Use “Other broadcasting service settings (RTMP)”
Wowza Use “Other broadcasting service settings (RTMP)”
Akamai Use “Other broadcasting service settings (RTMP)”
ULIZA Use “Other broadcasting service settings (RTMP)”
Classtream Use “Other broadcasting service settings (RTMP)”
vimeo Use “Other broadcasting service settings (RTMP)”

– Officially Supported Broadcasting Service – Broadcasting to this service is integrated into Dashboard for ease of setup.

– Authorized Broadcasting Service – You can broadcast to this service by manually setting up within Dashboard.

Cannot connect with Google account on Dashboard

About this Page

Since December 2019, there has been a problem where the Google account cannot be used on the Dashboard.
This problem has had the following impact.

Impact of this Problem

Not being able to use Google account with the Dashboard impacts operation in the following two ways.

  • Cannot log in using Google account
  • [YouTube Live] cannot be selected and livestream using the livestreaming destination service

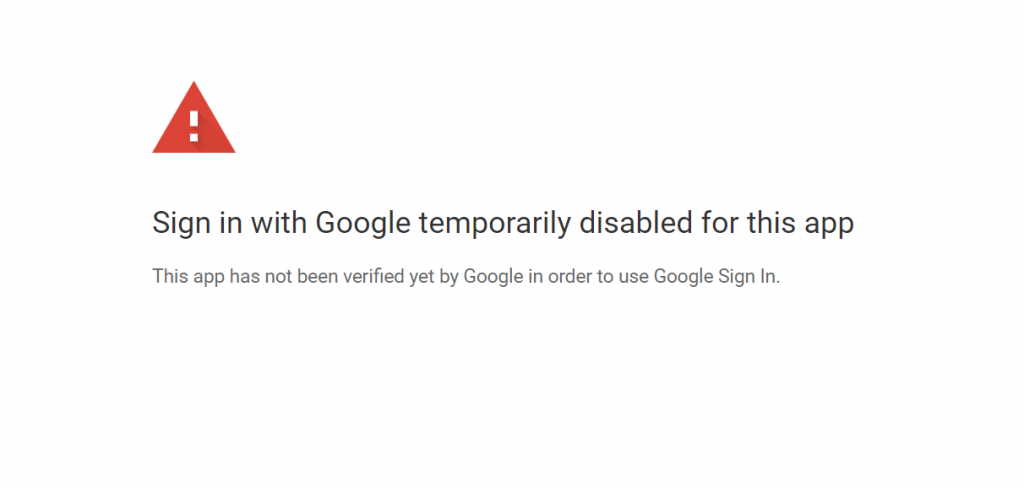
When using your Google account to log in and YouTube Live is selected as the livestreming destination, a screen like that shown below is displayed.

Prospects for Eliminating this Problem

The process is currently waiting for verification from Google.
It might take time for Google to conduct their investigation, so as of April 2020, there is no detailed estimate for the recovery period.

Method for Preventing Reoccurrence of the Problem

●If you cannot log into the Dashboard using your Google account

If up to now you have logged into the Dashboard using your Google account, you will need to create a new Dashboard account.
Please use the following method to create an account.

  1. First, initialize the LiveShell that is being used. Please refer to the respective LiveShell manual for the initialization method.
    • LiveShell PRO initialization
    • LiveShell 2 initialialization
    • iveShell X initialization
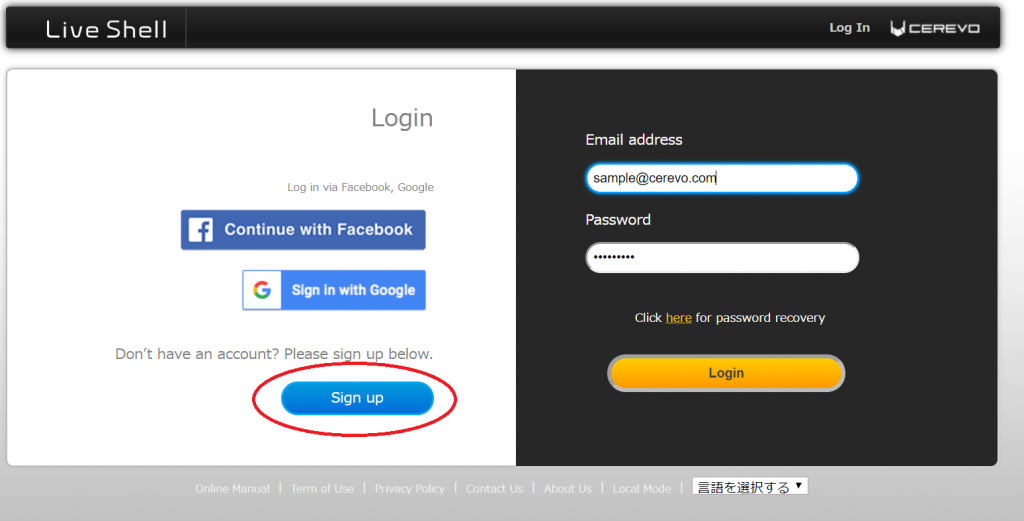
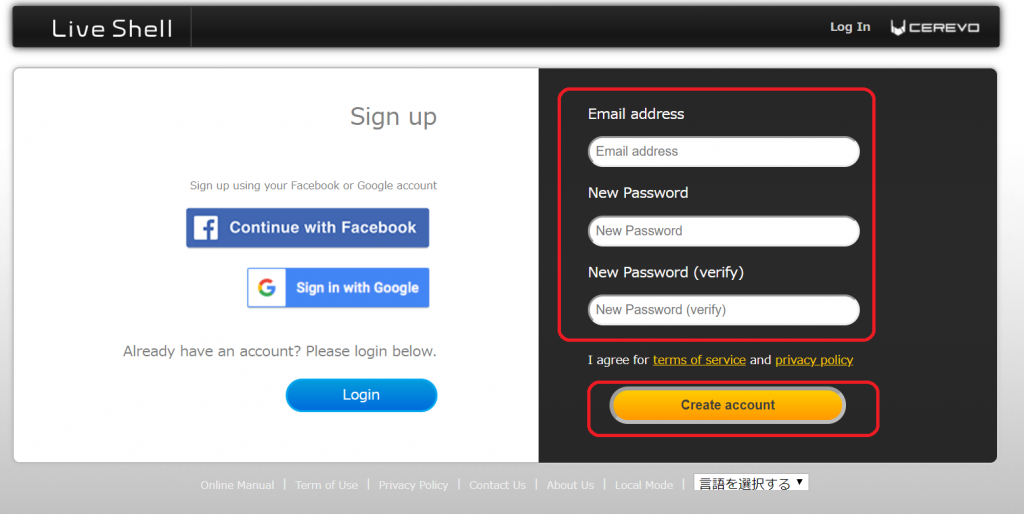
  1. Access the Dashboard and click on [Sign up]. Please log out if you are already logged into the Dashboard.
  2. Enter your email address, password.
    When you have finished entering all the items, please review the Terms of Use and Privacy Policy and then click on [Create account].
  3. An email from Cerevo will be sent to the email address entered during the above step, so clink on the URL link in that email.
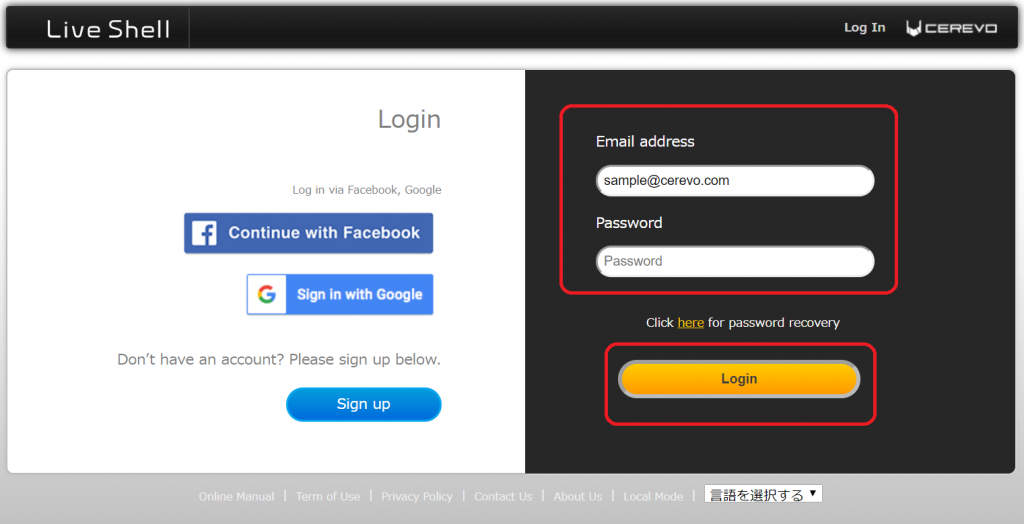
  4. Access the Dashboard and enter the set email address and password to log in.
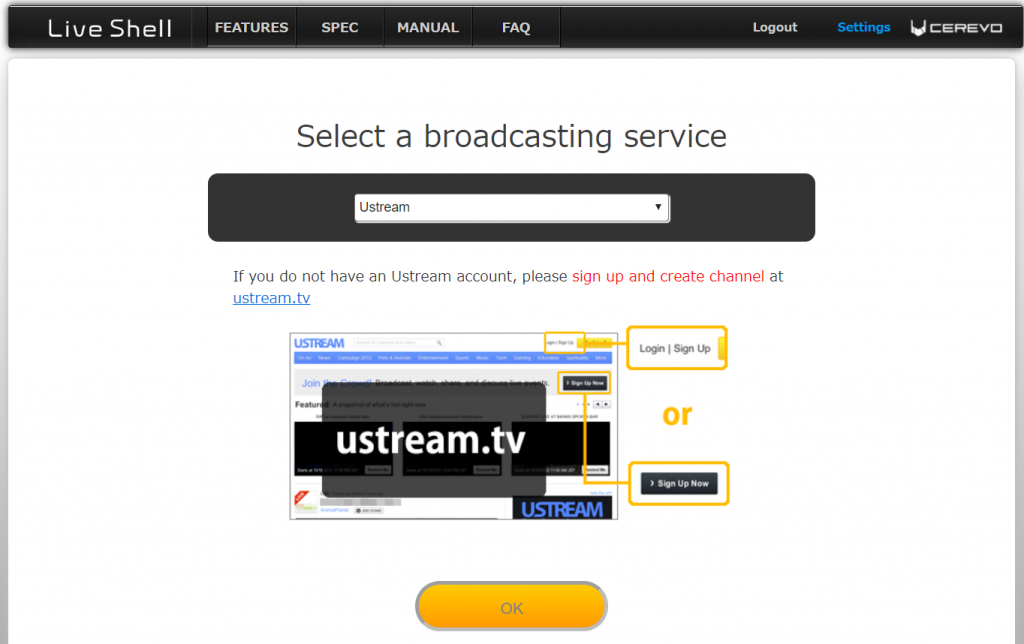
  5. Follow the screen to arrive at “Select a broadcasting service.”
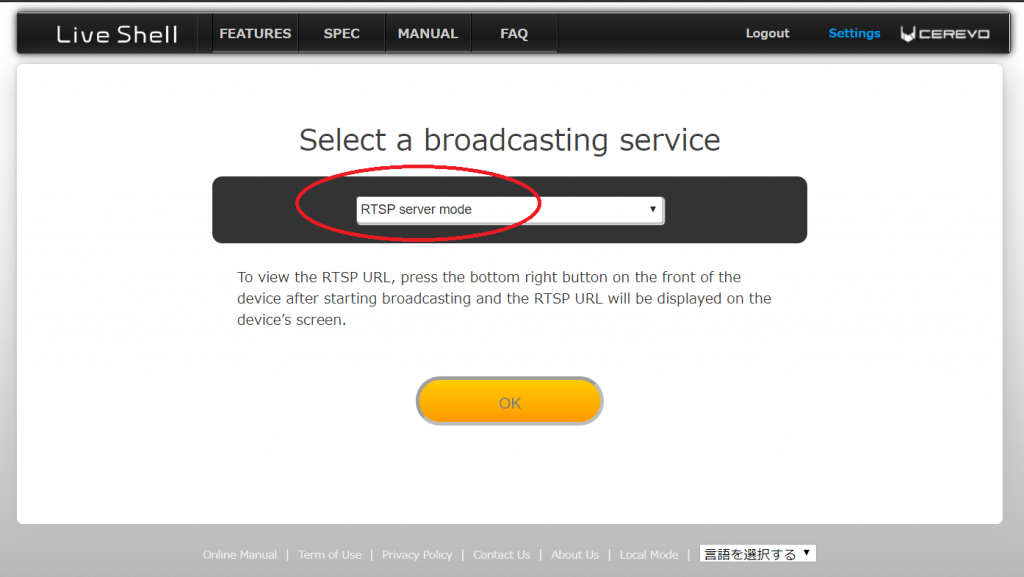
  6. If you want to use YouTube to be the livestreaming destination, select “RTSP Server Mode” instead of YouTube.
    If you plan to use a livestreaming destination other than YouTube, select the livestreaming destination you plan to use.
  7. After selecting the livestreaming destination, follow the screen to proceed to complete the Dashboard login.
    When the login to the Dashboard is completed, the following screen will be displayed.
    When livestream to YouTube Live, after the following log in after this, conduct the procedures for  livestream to YouTube Live.


Method for livestreming to YouTube Live after logging into the Dashboard

At the current time, the error will happen if you select YouTube Live as broadcasting destination. Use the following method to livestream to YouTube Live.

  1. Access YouTube and log in.
  2. Click on the video camera icon at the top right of the screen and then click on [Go live].It will then be possible to access YouTube Studio.
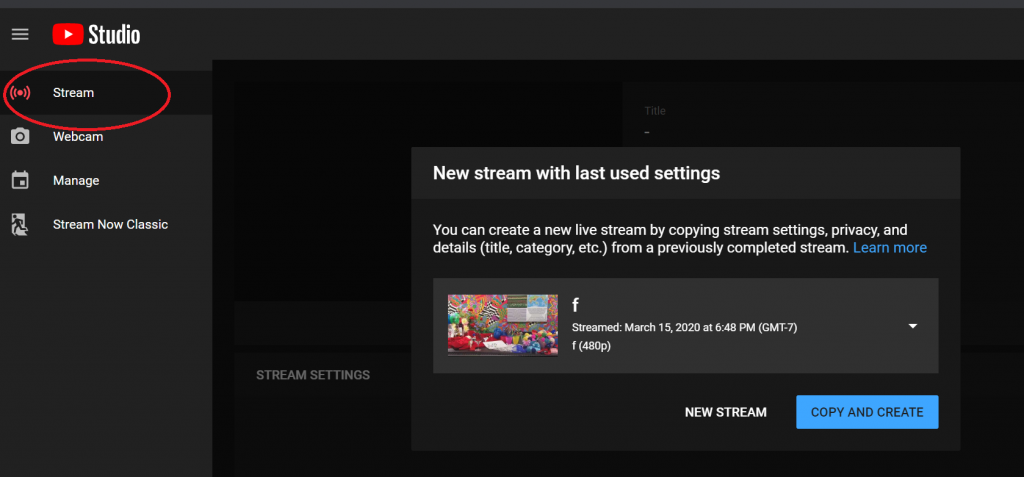
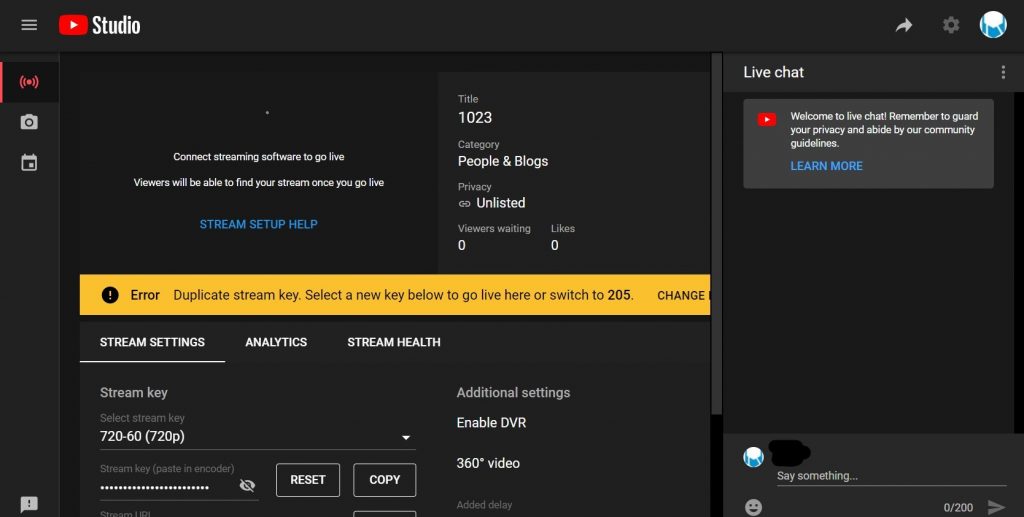
  3. When you have accessed YouTube Studio, click on [Stream].
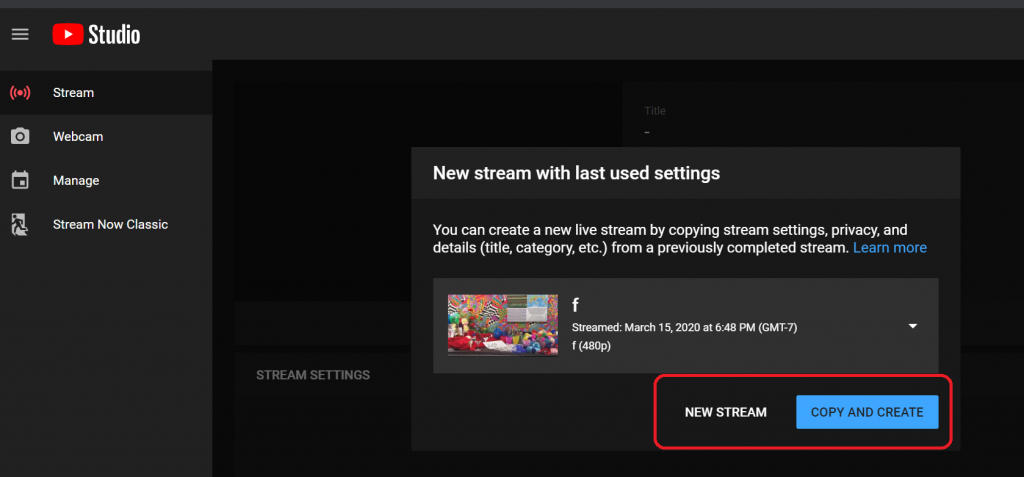
  4. To use the previously used settings unchanged, press [COPY AND CREATE].
    To create new settings, press [NEW STREAM].

    After that, enter the required items to create the live stream.
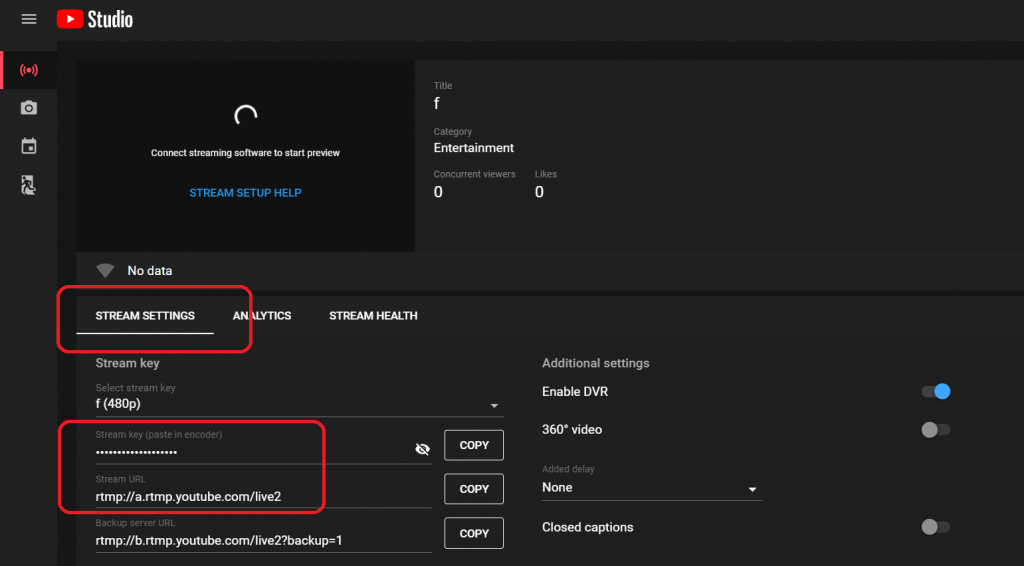
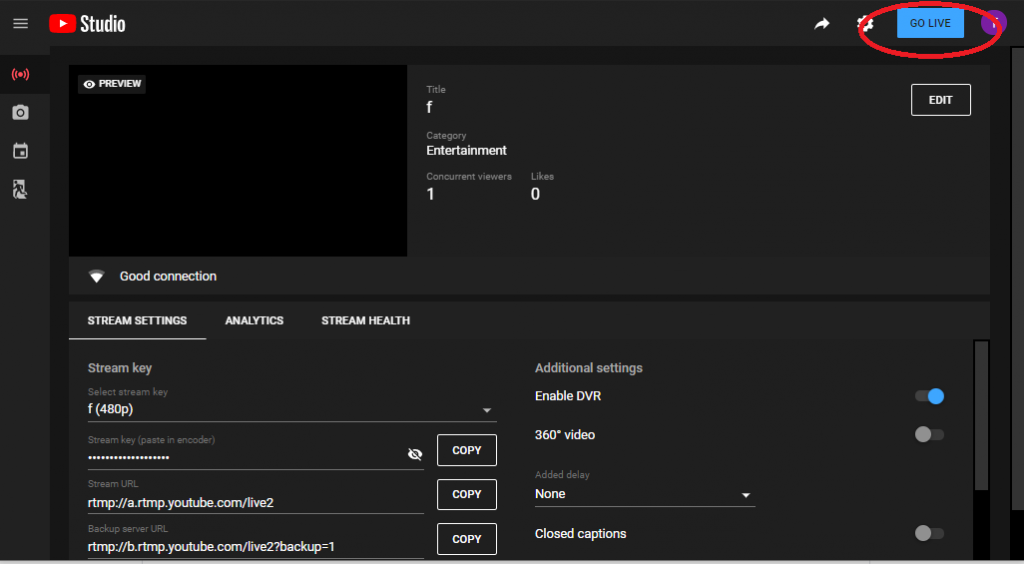
  5. Click on [STREAM SETTINGS] and confirm that “Streamkey” and “Stream URL” are displayed.
    If they are displayed normally, leave this page open because this information is required for the following procedure.
  6. Log into the Dashboard.
  7. Click on [Settings] at the top right of the Dashboard main screen.
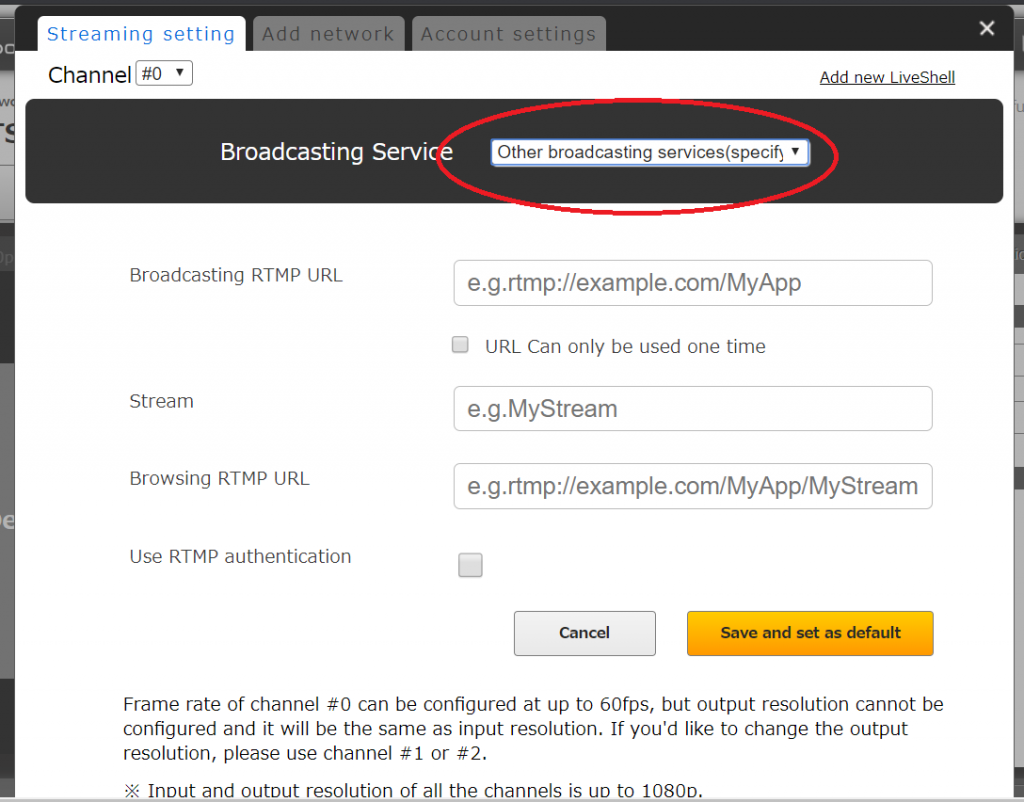
  8. Select [Other broadcasting services(specify RTMP URL)].
  9. Copy and enter the URL confirmed during Step 5 of “Stream URL.”
    For “Steam” as well, copy and enter the “Stream Key” displayed in the page left open in Step 5.
    It is alright if the “Browsing RTMP URL” is empty and “Use RTMP Verification” is not checked.
  10. When the message “Saved and will broadcast to this service next time.” is displayed, press the [x] button at the top right of the window to close the window.
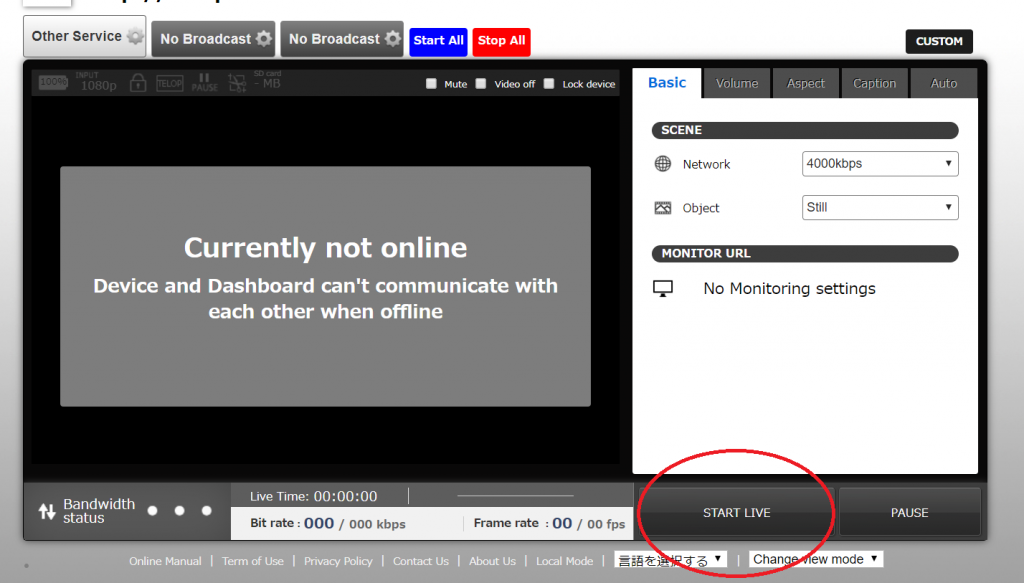
  11. Click on [START LIVE] at the top of the Dashboard.
  12. The YouTube page will open again.
    Conducting [Distribution Start] from the Dashboard using the above procedure will display a preview at the top of the YouTube page (It may take from several seconds up to around 30 seconds from clicking [START LIVE] to when the preview is displayed.).
    When the preview is displayed, confirm the desired image is being displayed.
    When you have confirmed this, click on [Go Live] to start actual distribution.


When selecting a YouTube Live event, the event does not load

This issue occurs when you have already created a YouTube Live event that does not have a specified start time.

Please follow the steps below to delete the YouTube Live event. After that, please re-create the event from Dashboard.

  1. Open YouTube Studio
  2. Select “Start Live Streaming”
  3. Select “Encoder Delivery”
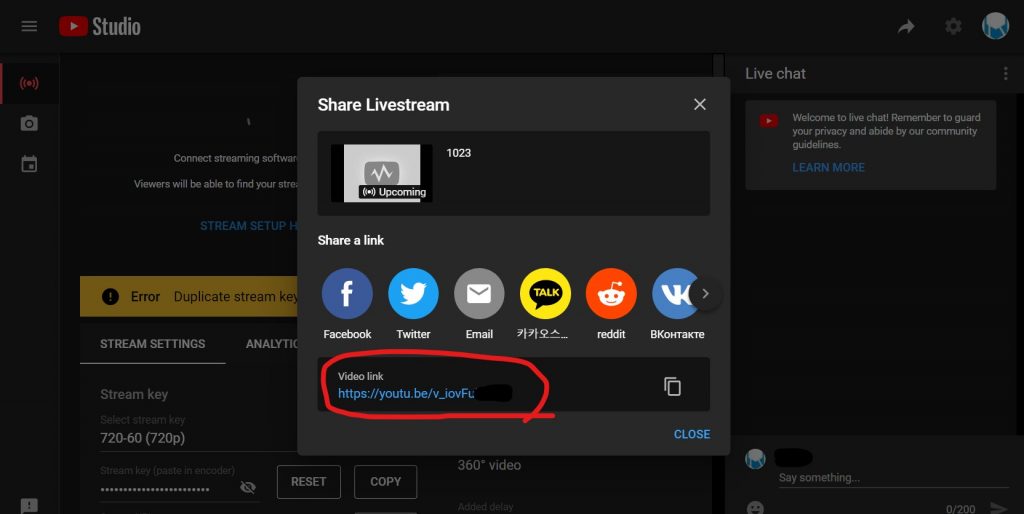
  4. Select “Share” (arrow icon on the top right corner of the screen)
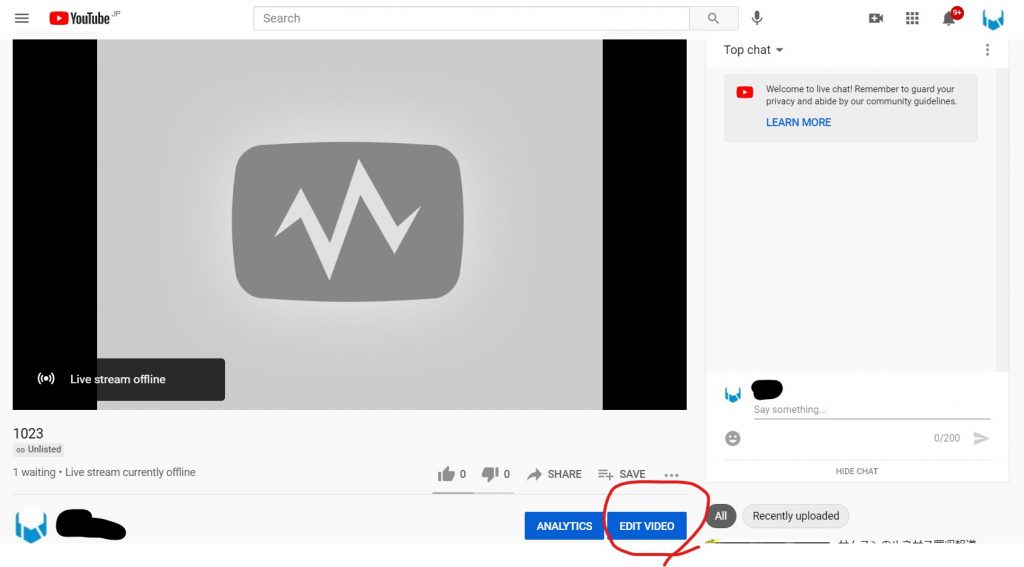
  5. Click the video link URL to load the video page.
  6. Select “Edit Video”
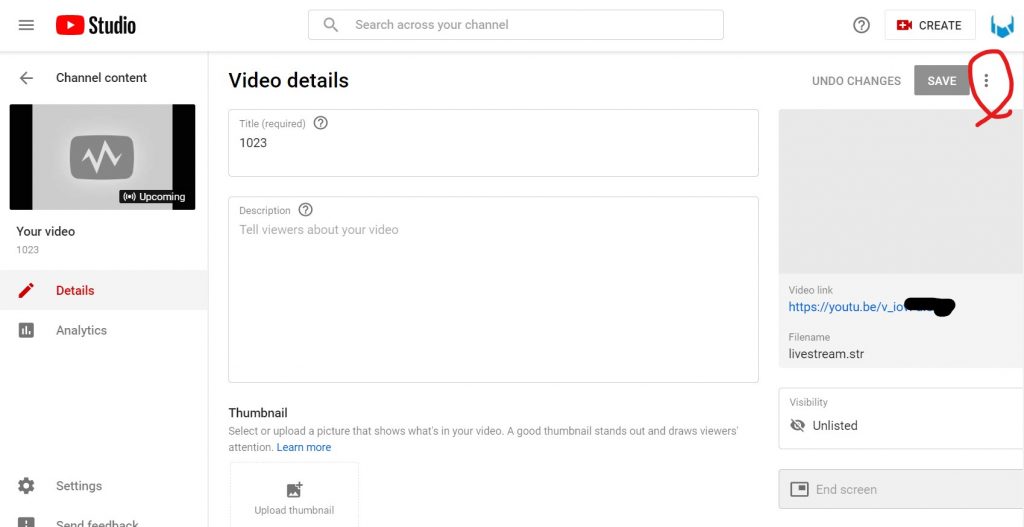
  7. Select [Options] (the 3 dot icon on the upper right of the screen, next to [Save]), and then select [Delete]
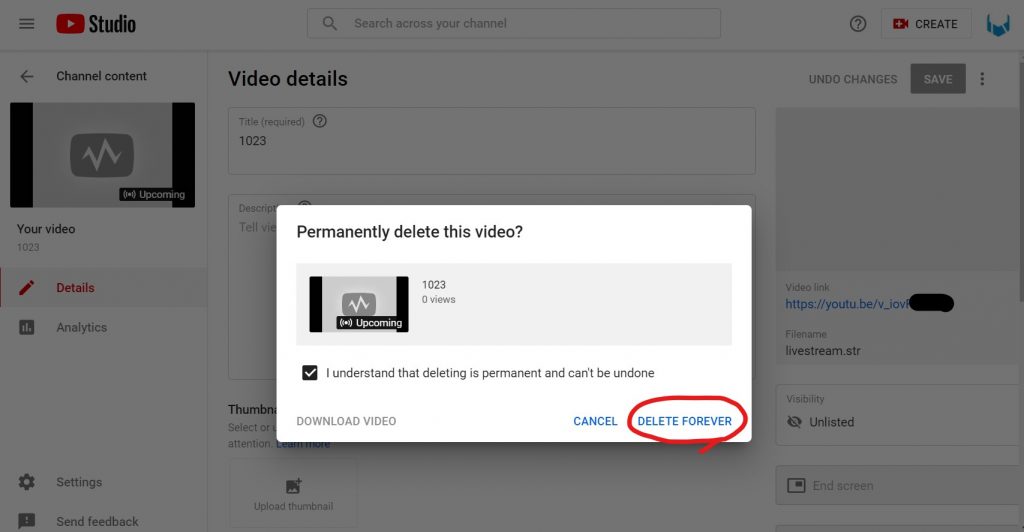
  8. Check “I understand that deleting is permenant and can’t be undone”
  9. Select “Delete Forever”

After the above actions, you will be able to re-create the event in Dashboard and it will be displayed.

Timecode Settings

With Firmware Rev. 2021 or later, you can add timecode* to a video stream (H.264, picture timing SEI) from LiveShell X.

*When the timecode function is enabled, time information will be embedded in the broadcasted video, but time information will not be displayed on the video stream.

Please follow the steps below to enable the timecode function.

  1. Make sure that the firmware version of your LiveShell X is Rev.2021 or later.
  2. Open the browser of your PC/smartphone/tablet on the same LAN as LiveShell X and type the following in the address field.
    http://<liveshell’s IP>:11250/ntp/
    The timecode settings page will appear. On this page, you can set the destination NTP server and check the synchronization status.
  3. In the NTP Setting field, please enter the address of the ntp server you want to connect to (e.g. ntp.nict.jp).
  4. The settings will take effect after the restart, so please reboot LiveShell X after entering the settings.
  5. After restarting, timecode will be emdedded in the video stream from LiveShell X.

To disable the timecode function, please set the text box field of NTP Setting to blank (no characters) and restart LiveShell X.

How to set up Screen Saver

LiveShell X has an OLED front display panel. We recommend using the LiveShell X screen saver function in order to avoid discoloration of the display panel if you use LiveShell X for continuous operation.  

When the screen saver is turned on, the display information will move up and down to prevent screen burn-in when the main unit buttons are not used after the specified time. 
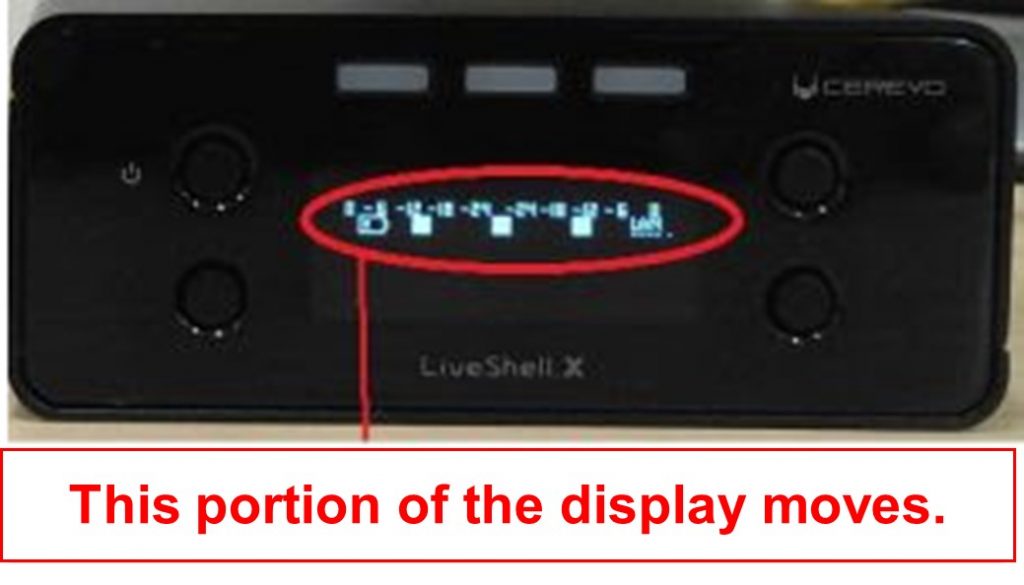


You can set up the screen saver by following these steps.

When LiveShell X is OFFLINE

1. Make sure the home screen is displayed on the device. The home screen displays a power icon and a spanner icon. Push the upper right button until “Configuration” is shown.


2. Select “Broadcasting” by pushing the lower right or left button, then press the upper right button to confirm.
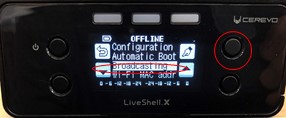


3. Select “Screen Saver” by pushing the lower right or left button, then press the upper right button to confirm.
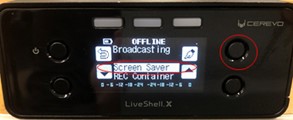


4. Select the number of minutes before the screen saver is displayed by pushing the lower left or lower right button.
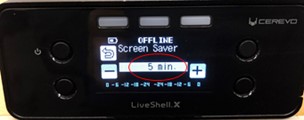


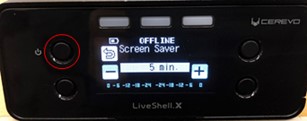
5. Push the upper right button to confirm your settings.


When LiveShell X is ONLINE

1. Make sure LiveShell X is ONLINE. Push the upper right button and select “Broadcasting”.


2. Select “Screen Saver” and push the upper right button.
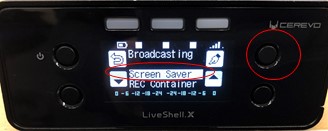


3. Select the number of minutes before the screen saver is displayed by pushing the lower left or lower right button.
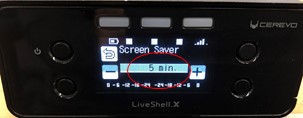


4. Push the upper right button to confirm your settings.