LiveShell PRO

Back light turns on but nothing is displayed on LCD

LiveShell PRO should turn on after pressing the upper left button and holding it 5 seconds if the battery is charged or the AC adapter is connected.

During startup LiveShell PRO completes the following steps.

  1. Turns on back light
  2. Displays Cerevo logo.
  3. Displays LiveShell PRO logo
  4. Checks network access

sample

There may be cases where LiveShell PRO hangs when displaying the Cerevo or LiveShell PRO logo. Please attempt a force shutdown (see this link) and check if the problem is resolved.

If you cannot solve the problem

Please contact our support team (support-global@cerevo.com) and include the following information.

  • At which point the LiveShell PRO hangs.
  • That you have already tried a force shutdown but the problem was not resolved.

How to check DHCP static IP address

Wired LAN

  1. Make sure the home screen is displayed on the device. The home screen has a power icon and a spanner icon.
    photo_2016-07-07_12-40-16
  2. Press the upper right button and go to “Configuration”.
    b
    a
  3. Select Network and press the upper right button.
    1
  4. Select “Ethernet” and press the upper right button.
    2
  5. “DHCP” or “Static Adress”will be displayed on the device screen and the one displayed is the current setting.
    After selecting DHCP or static address, press the upper left button.
    4

Wireless LAN

  1. Make sure the home screen is displayed on the device. The home screen has a power icon and a spanner icon.
    photo_2016-07-07_12-40-16
  2. Press the upper right button and go to “Configuration”.
    b
    a
  3. Select Network and press the upper right button.
    1
  4. Select “Wi-Fi #x”(“Wi-Fi #1” is the 1st priority connection) and press the upper right button.
    5
  5. Select “Address Type” and press the upper right button.
    6
  6. “DHCP” or “Static Adress”will be displayed on the device screen and the one displayed is the current setting.
    After selecting DHCP or static address, press the upper left button.
    4

LiveShell PRO bandwidth requirements

For high quality live streaming an average upload speed of 2Mbps is required.
If the network upload speed is around 300kbps broadcasting will be limited to 3~5fps with low quality sound.

This example live stream on Ustream (Akihabara Live Camera*) is being broadcast at 2Mbps.
*Akihabara Live Camera has been broadcast via LiveWedge since Aug. 2015.

Live streaming to unofficially supported services

As of July 2016, LiveShell PRO officially supports Ustream, YouTube Live, Twich, Niconico Live and Twitcasting.
However it may possible to broadcast to other services if those services provide a RTMP URL and stream name (stream key), due to the wide varitery of different services available we cannot guarantee compatability with every service.

If you have issues connecting to an RTMP streaming service, please contact the streaming provider to check the service is compatible with your LiveShell device.

To broadcast to an unofficially supported service, please select “Other broadcasting services (specifiy RTMP URL)” from the “Broadcasting Service” dropdown in Dashboard. Please check this link for more details.
1


How to check LiveShell PRO MAC address

Follow the instructions below to check the LiveShelll PRO MAC address.

[When using wired LAN]

  1. Make sure LiveShell PRO is offline and shown on the home screen.
    photo_2016-07-07_12-10-51
  2. Push the lower right button twice.
    photo_2016-07-07_12-13-18
  3. The MAC address will be shown following “Eth MAC:”
    photo_2016-07-07_12-10-46

[When using wireless LAN]

  1. Make sure LiveShell PRO is offline and shown on the home screen.
    photo_2016-07-07_12-10-51
  2. Push the upper right button, then go to “Configuration”.
    b
    a
  3. Push the lower right button and select “Wi-Fi MAC addr”.
    b
  4. Push the upper right button, then the Wi-Fi MAC address will be shown on the device screen.
    c
    photo_2016-07-07_12-23-17

How to check the current LiveShell PRO firmware version

From the device display

1. Make sure the home screen is displayed on the device. The home screen has a power icon and a spanner icon.
photo_2016-07-07_12-40-16
photo_2016-07-07_12-42-21

2. Push the lower right button once or several times (the number of times will vary depending on the broadcasting situation).
photo_2016-07-07_12-13-18

3.”Rev.XXXX” will be shown on device display and this is the current firmware version.
photo_2016-07-07_14-30-53

From Dashboard

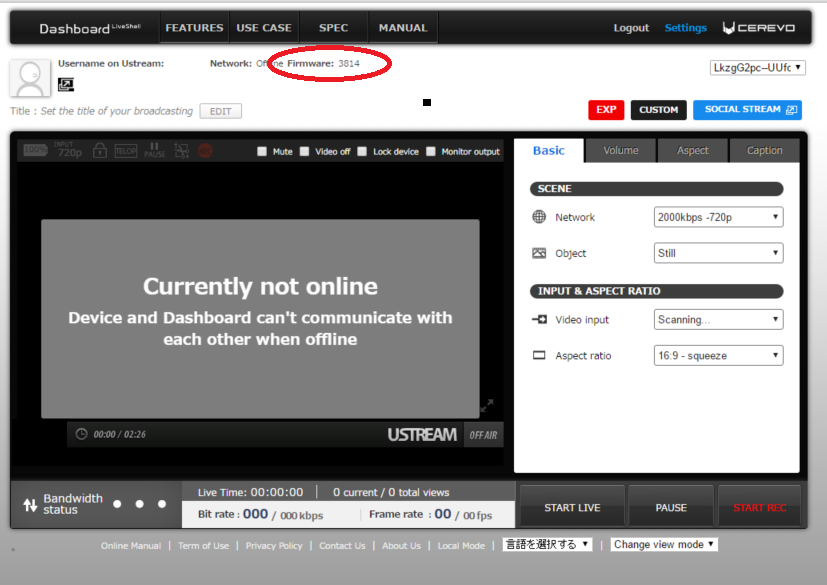
The current firmware version is shown on Dashboard.
SnapCrab_Dashboard LiveShell PRO - Google Chrome_2016-7-7_14-32-18_No-00

How to initialize LiveShell PRO

LiveShell PRO can be initialized following the instructions below.

1. Make sure the home screen is displayed on the device. The home screen has a power icon and a spanner icon.
photo_2016-07-07_12-40-16

2. Press the upper right button and go to “Configuration”.
b
a

3. Select “Initialize” by pushing the lower right or left button.
aa
bb

4.Select “Yes” by pushing the lower right or left button.
cc

5. Push the upper right button to initialize.
dd

Using unofficial AC adapters

Cerevo recommends you do not use any AC adapter other than the one provided or sold at the Official Cerevo Store.

If you use any unofficial AC apdaters, your warranty will be void.

In case you have a special need to use an unofficial AC adapter, make sure the output and plug type match the specifications below.

Mini USB type

Output : 5V / 1500mA
Plug type: Mini USB

Round type

Output : 5V /1500mA
Plug type :  Outside diagram 5.5mm / Inside diagram 2.1mm / Center plus


Live streaming while teathering

With LiveShell PRO it is possible to live stream via Wi-Fi tethering to a smart phone or tablet.

LiveShell PRO originally did not support 5GHz Wi-Fi (IEEE 802.11 a/n/ac).

If you want to connect to a 5GHz Wi-Fi hotspot or router, it is required you update the firmware to Rev.3769 or later and to use the Official 5GHz/2.4GHz USB Wi-Fi adapter.