2. Initial Set Up

2-1a. Ustream (Initial setup)

Make sure you need to prepare user registration on Ustream and creating channel to proceed these steps.

  1. Access to http://shell.cerevo.com/login and sign in Dashboard.
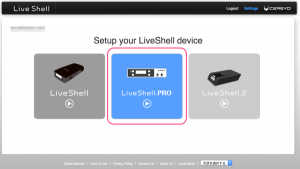
  2. Select “LiveShell PRO”.
    ub200_en_cap_initsetup01
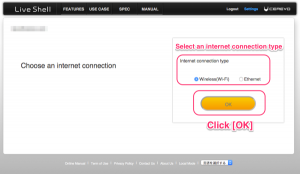
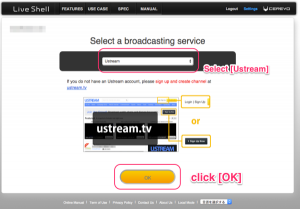
  3. Select [Ustream] and click [OK] button.
    ub200_en_cap_ustinitsetup02
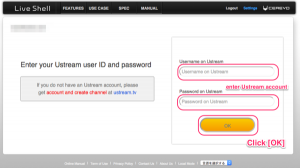
  4. Enter your Ustream username/email and password and click [OK] button.If you don’t have ustream account,register and create your broadcasting channel before proceed this set up.
    ub200_en_cap_ustinitsetup03
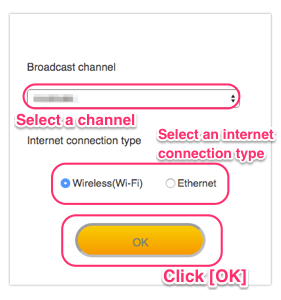
  5. Select a channel and an internet connection type and click [OK] button.
    ub200_en_cap_ustinitsetup04
  6.  Proceed to step 2-2.

2-1b. Niconico Live (initial setup)

Currently, due to a specification change on the platform side, only live-streaming via RTMP URLs, etc. is possible.
We will inform you of the normal live-streaming method as soon as it is available.
▶︎How to live-streaming at RTMP URLs

Make sure you need to prepare user registration(Niconico Live is available only for paid account) on niconico to proceed these steps.

  1. Access to http://shell.cerevo.com/login and sign in Dashboard.
  2. Select “LiveShell PRO”.
    ub200_en_cap_initsetup01
  3. Select [Niconico Live] and click [OK] button.
    ub200_en_cap_initniconicosetup01
  4. Enter your niconico id(email) and password.
    ub200_en_cap_initniconicosetup02
  5. Select an internet connection type.
    ub200_en_cap_initsetup_internetconnctiontype
  6. Proceed to step 2-2.
  7. When you finish to setup section 2-2 and 2-3, you need to login niconico and start livestream in niconico dashboard.See section 5-6. in detail

2-1c. Other broadcasting services (initial setup)

Make sure you need to prepare RTMP server address(URL) and other informations your RTMP server required to proceed these steps.

  1. Access to http://shell.cerevo.com/login and sign in Dashboard.
  2. Select “LiveShell PRO”.
    ub200_en_cap_initsetup01
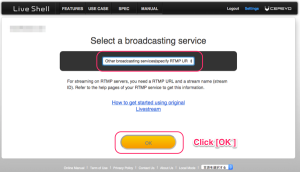
  3. Select [Other broadcasting services] and click [OK].
    ub200_en_cap_initotherssetup01
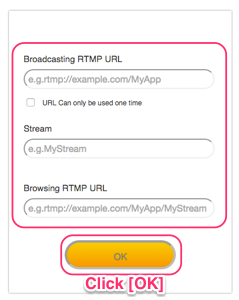
  4. Enter Broadcasting RTMP URL and other informations.
    ub200_en_cap_initotherssetup02
  5. Select an internet connection type.
    ub200_en_cap_initsetup_internetconnctiontype
  6. Proceed to step 2-2.

How to get general RTMP streaming service settings

If you would like to broadcast from your favorite RTMP streaming service not list in LiveShell Dashboard, see settings or encoder setting section and these information.
Here is a sample web information for setting as [Other broadcasting services]
ub20x_cap_en_otherstreaming01

How to get YouTube Live [Stream now] settings

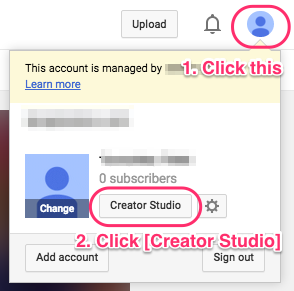
  1. To get YouTube [Stream now] settings, login to YouTube and click your account pictogram right-top of the screen and click [Creator Studio] button.
    ubx_en_cap_streamnowsetting01
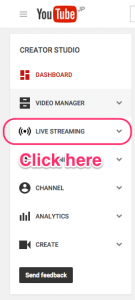
  2. Click [LIVE STREAMING] link from the left side menus
    ubx_en_cap_streamnowsetting02
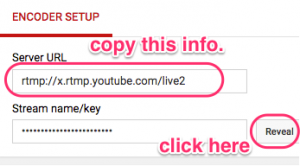
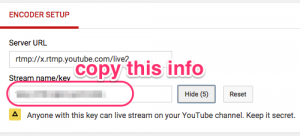
  3. You will see RTMP server address and stream(name/key) at [ENCODER SETUP] section.And click [Reveal] to copy stream(name/key) value.
    ubx_en_cap_streamnowsetting03
    ubx_en_cap_streamnowsetting04

2-1e. YouTube Live for live events (initial setup)

To start YouTube Live with LiveShell PRO

You need to create YouTube(Google) account and a lot of confirmation in YouTube web site.
Make sure you can live stream in YouTube without LiveShell PRO.And then follow these steps.

And also there are two feature in YouTube live.[Stream now(Beta)] and [Events] (as of Mar. 2016).[YouTube Live] preset menu in Dashboard is for [Events].If you would like to use [Stream now(Beta)], you need to select [Other broadcasting services] and enter information.You may find that information at [CREATOR STUDIO] > [Stream now] in YouTube.See section 2-1c. in detail

Preparing for YouTube Live

  • Phone number not verified other YouTube accounts twice or more within a year.
  • Create your channel and then need to verify your account
  • Confirm that your channel in good standing(*)

*See [Keep your YouTube account in good standing] for more information(external web page).

Note : If you need more detailed information, please visit YouTube help forum(external web page)

Setup steps

  1. Access to http://shell.cerevo.com/login and sign in Dashboard.
  2. Select “LiveShell PRO”.
    ub200_en_cap_initsetup01
  3. Select [YouTube Live] and click [OK] button.
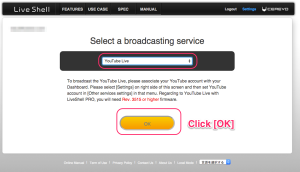
    ub200_en_cap_youtubeinitsetup01
  4. If you login Dashboard as Cerevo account or Facebook authenticated account that doesn’t coordinate with Google account,you see account setting dialog window.Press [Connect] button and proceed google authentication.After that re-select [YouTube Live] and click [OK] button.
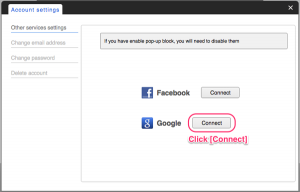
    ub200_en_cap_googleaccountcoordinate
  5. Next, you will set event schedule and stream resolution.Click [Create new event] and enter event information.
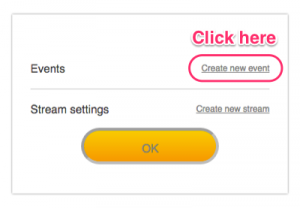
    ub200_en_cap_youtubeinitsetup02
  6. And you can set these basic items from Dashboard.Advanced settings can be set in [Events] page (in YouTube).Also you need to set current time or later into event [start time].
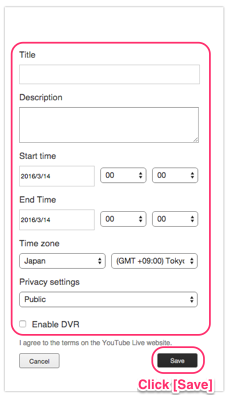
    ub200_en_cap_youtubeinitsetup03
  7. In Privacy settings section, you can set [Public], [Unlisted] and [Private].
    • Public:
      The streaming is public and anybody can search and watch.
    • Unlisted:
      The streaming is public but not listed in search results or on your channel.So only those who know the broadcasting address can watch the stream.
    • Privete:
      The streaming won’t appear on your channel or search results and will be invisible to other users.
  8. DVR feature allows viewing audience to pause, rewind, and play from any point in the event up to 4 hours before the actual live streaming.If you would like to enable this feature, check [Enable DVR].
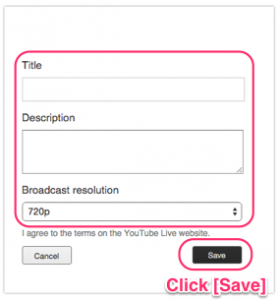
  9. Click [Create new stream] and set resolution.We recommend to use 720p for LiveShell PRO.And click [Save].
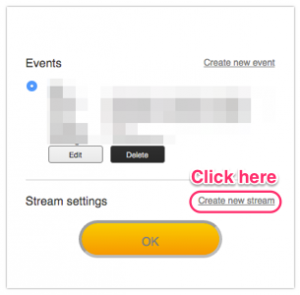
    ub200_en_cap_youtubeinitsetup05
    ub200_en_cap_youtubeinitsetup04
  10. Click [OK] button If you already set both event and stream.
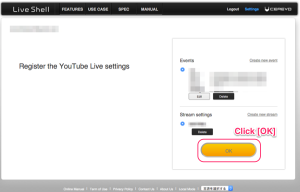
    ub200_en_cap_youtubeinitsetup06
  11. Select an internet connection type.
    ub200_en_cap_initsetup_internetconnctiontype
  12. Proceed to step 2-2.After finish set up in 2-3, and then see 5-7 step 12 or later about Dashbaord operation to start live streaming.
2-1f. Facebook Live (initial setup)

  1. Access http://shell.cerevo.com/login and sign in to Dashboard.
  2. Select “LiveShell PRO” from the device list.
    ub200_en_cap_initsetup01
  3. Select [Other broadcasting services] and click [OK].
    ub200_en_cap_initotherssetup01
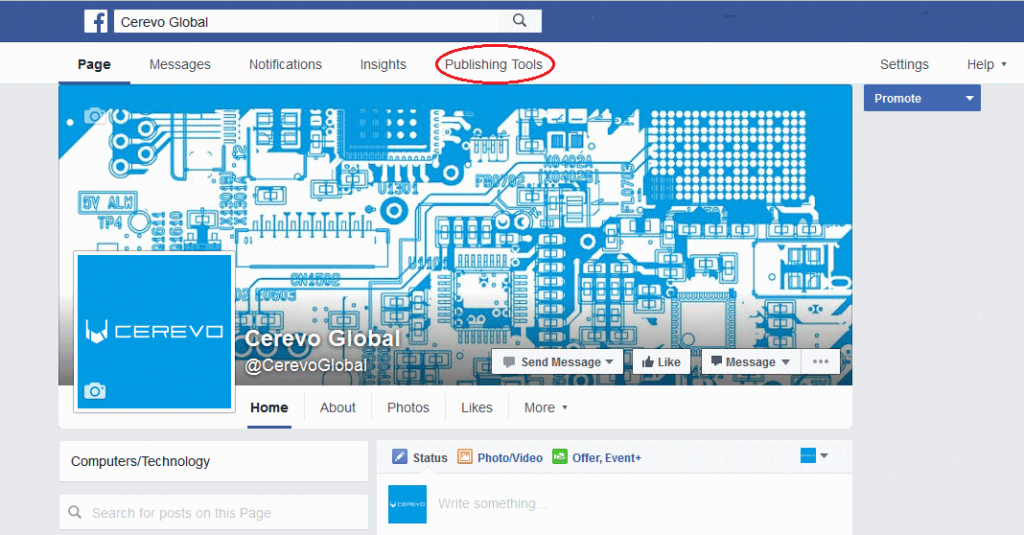
  4. Open a browser window, login to your Facebook account, go to your managed page and click on [Publishing Tools] in the page controls menu.
    fblive1a
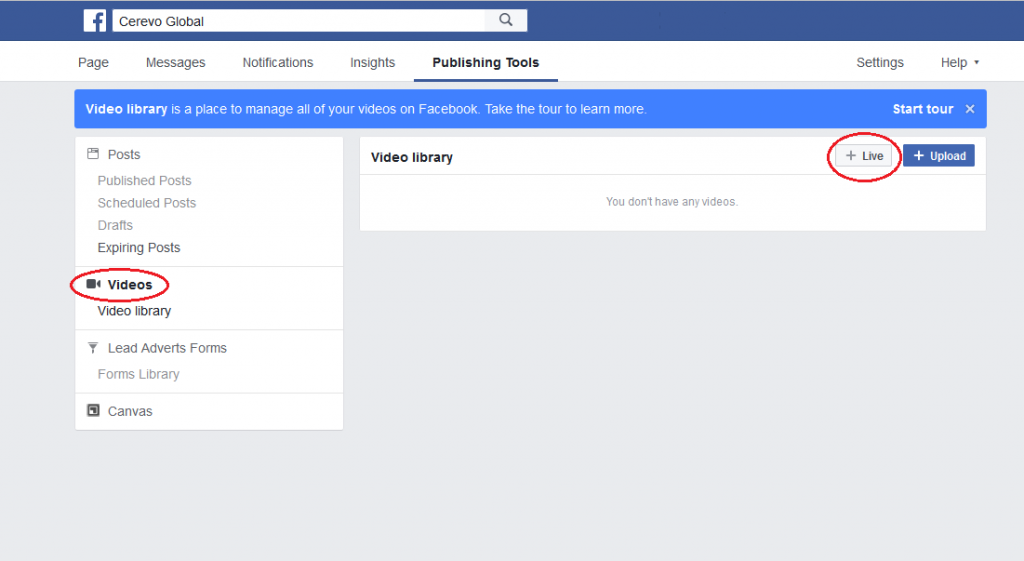
  5. On the publishing tools screen click [Videos] on the left hand menu then click the [+Live] button.
    fblive2
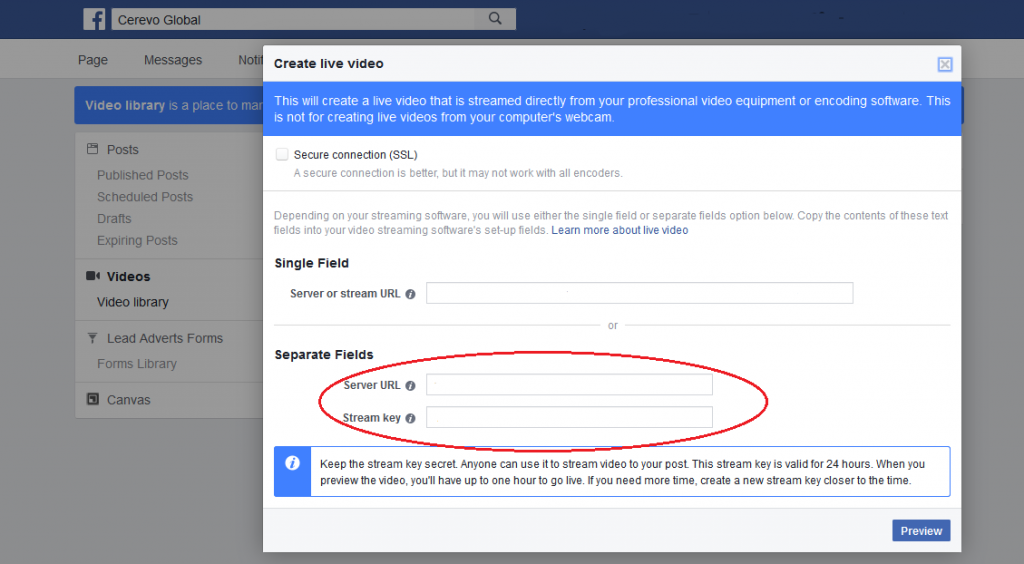
  6. On the Create live video window, make a note or copy the [Server URL] and [Stream key] fields.
    fblive3
  7. Return to LiveShell Dashboard and enter the RTMP server information from Facebook as follows –
    Server URL>Broadcasting RTMP URL
    Stream key>Stream
    Leave [Browsing RTMP URL] blank, then click the [OK] button.
    ub200_en_cap_initotherssetup02
  8. Select an internet connection type and proceed to step 2-2.
    ub200_en_cap_initsetup_internetconnctiontype

2-1g. Twitch(initial setup)

Currently, due to a specification change on the platform side, only live-streaming via RTMP URLs, etc. is possible.
We will inform you of the normal live-streaming method as soon as it is available.
▶︎How to live-streaming at RTMP URLs
  1. Access to http://shell.cerevo.com/login and sign in Dashboard.
  2. Open another window or tab and login Twitch.If you don’t have account, sign up and login Twitch.
  3. Select “LiveShell PRO”.
    ub200_en_cap_initsetup01
  4. Select [Twitch].
    ubx_en_cap_twitchsetting01
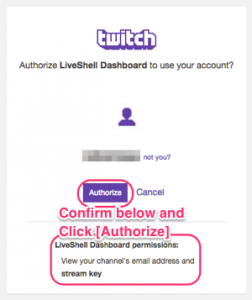
  5. You will see pop-up window to ask you give your Twitch information to our Dashboard.Click [Authorize] button.
    ubx_en_cap_twitchsetting02
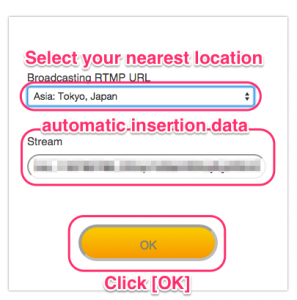
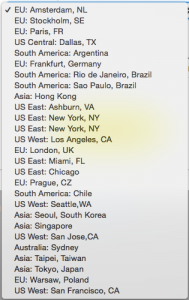
  6. Dashboard automatically insert streming information(Stream) and then you need to select the closest server location to where you will broadcast from
    info [Broadcasting RTMP URL]
    ubx_en_cap_twitchsetting03
    ubx_en_cap_twitchsetting04

  7. Select an internet connection type.
    ub200_en_cap_initsetup_internetconnctiontype
  8. Proceed to step 2-2.
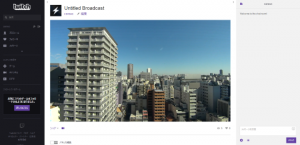
  9. When you finished section 2-3. network setting, then you will see Dashboard main panel, but due to Twitch’s operation restriction, you cannot see preview in your Dashboard.But needless to say that you can control bitrate, or all of other settings in your Dashboard.To check preview, would you please refer to Twitch Dashboard (https://www.twitch.tv//dashboard ).
    ubx_cap_twitchsetting05

2-2. Cable connection and Power on

  1. Insert the AC adapter cable into the AC jack located on the back of the LiveShell PRO device.
  2. Connect your camcorder via the HDMI cable or the AV cable.
  3. Ethernet: Connect the ethernet cable.
  4. Wi-Fi: Make sure that the USB WiFi adapter is connected.
  5. Press and hold the power button for five seconds to power on.
  6. Select the language using the arrow buttons to scroll through the choices.  Click the button at the top right corner to confirm your selection.
  7. Proceed to Ethernet Set Up or Wi-Fi Set Up.

2-3a. Ethernet setup

  1. Check the PIN displayed in the unit’s LCD.
  2. Enter PIN in Dashboard and click [OK] button.
  3. Then LCD change and will display [LIVE].And you can see Dashboard main panel on your PC(or other devices) when setup is complete.
    * For niconico Live, you need to setup in niconico web site.please refer to niconico web page [Stream Live on Niconico!].
    * For RTSP server mode, please refer to the RTSP server setting.

2-3b. Wi-Fi set up

  1. You will see the message on the unit’s LCD [Register me at s.cerevo.com.]
  2. Enter your Wi-Fi ESSID and Wi-Fi passphrase.
  3. Connect one end of the attached setup cable to the “MIC IN” port on the LiveShell Pro and connect the other end to the headphone jack as depicted in the image below.
    And then click [Play] button.
  4. Then LCD change and will display [LIVE].And you can see Dashboard main panel on your PC(or other devices) when setup is complete.
    * For niconico Live, you need to setup in niconico web site.please refer to external web page [Stream Live on Niconico!].
    * For RTSP server mode, please refer to the RTSP server setting.